Method 1:
Step 1 – Disable The Windows Media Player Network Sharing Service
First of all make sure that Windows Media player is closed. To start, by Click the Windows Start Menu Orb and Type services.msc in the search box. Then Press Enter to open theServices window.

From the Services window find the Windows Media Player Network Sharing Service.To disable it,Right-Click it and Select Stop. A small dialog box may temporarily appear while the process is being stopped.

Step 2 – Delete The Library Database File
Keep the Services window open, we’ll need it again later on to re-enable this service after we first delete a few files.
Open up Explorer and Browse your way to:
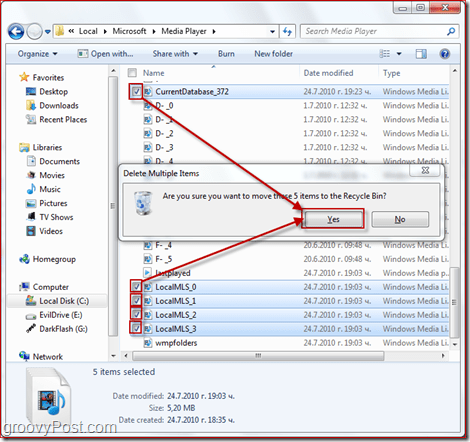
%USERPROFILE%\AppData\Local\Microsoft\Media Player.
From here delete all of the files named CurrentDatabase_***.wmdb andLocalMLS_*.wmdb. (Warning – there are several LocalMLS_*.wmdb files, make sure to delete them all!) (Note – The “*” stands for a random number, the numbers differ on each machine, so we can’t really tell exactly what the file is called. There are only a few files, though, you should find them easily).

Step 3 – Re-enable The Windows Media Player Network Sharing Service
You can now close the Explorer window and get back to the Services window. From theServices window, find the Windows Media Player Network Sharing Service again, but this time when Right-Clicking select Start. Yet again a small dialog box will temporarily appear while the process is being enabled.

Step 4 – Refresh Your Library
Now all you have to do is open up WMP 12 and watch your library rebuild itself. Depending on the amount of songs you have and how fast your computer is this process can take from 30 seconds to 15 minutes. For my tiny 429 track library it took less than 2 minutes, which is quick keeping in mind that ALL my tracks (yes, all of them) are tagged with album art and all other information.
Method 2:
To resolve this problem, clear the Windows Media Player database. To do this, follow these steps:
- Exit Windows Media Player.
- For Windows XP:
Click Start, click Run, type %userprofile%\Local Settings\Application Data\Microsoft\Media Player, and then click OK.
For Windows Vista:
Click Start, All Programs->Accessories->Run, type %LOCALAPPDATA%\Microsoft\Media Player, and then click OK. - Select all the files in the folder, and then click Delete on the File menu.
Note You do not have to delete the folders that are in this folder. - Restart Windows Media Player.
Note Windows Media Player automatically rebuilds the database.
- Exit Windows Media Player.
- If you are running Windows XP, click Start, click Run, type %userprofile%\Local Settings\Application Data\Microsoft, and then click OK.
If you are running Windows Vista, click Start, All Programs->Accessories->Run, type%LOCALAPPDATA%\Microsoft, and then click OK. - Select the Media Player folder, and then click Delete on the File menu.
- Restart Windows Media Player.
Note Windows Media Player automatically rebuilds the database.
References:
http://www.groovypost.com/howto/microsoft/windows-7/how-to-rebuild-your-windows-media-player-12-library/
http://support.microsoft.com/kb/925718
http://www.groovypost.com/howto/microsoft/windows-7/how-to-rebuild-your-windows-media-player-12-library/
http://support.microsoft.com/kb/925718

No comments:
Post a Comment