If you get a message you have been logged into a temporary profile in Windows 7 computer, then it’s not your correct profile. You may miss your icons on desktop, any customized settings in Windows 7 by this temp profile issue. This post explains how easily you can fix temporary profile in Windows 7 issue.
By restarting or re logging to Windows 7 computer will not help you in this case. This temp profile issue rises because of a registry key.
Fix Temporary Profile in Windows 7 Issue
1) Log in with temp profile.
2) Start registry editor by typing regedit in find box in Windows 7.
3) Navigate the following location in Windows 7.

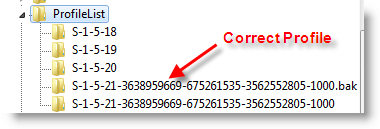
4) You can see similar keys under profile list with .bak difference, as shown below.

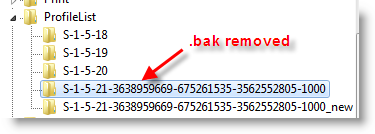
5) Your correct profile key is marked as bak. Currently your Windows 7 computer logged in with fresh profile with same key. So, rename the new profile key ( which is not having.bak) and remove .bak from correct profile key. See below.

6) That’s it. Log off and log in with your user name and password. You must get your icons and profile settings back in Windows 7. This is very simple and easy method to fix temp profile in Windows 7 issue.
Method 1: Fix the User Account Profile
To do this, follow the steps below:
Important This section, method, or task contains steps that tell you how to modify the registry. However, serious problems might occur if you modify the registry incorrectly. Therefore, make sure that you follow these steps carefully. For added protection, back up the registry before you modify it. Then, you can restore the registry if a problem occurs. For more information about how to back up and restore the registry, click the following article number to view the article in the Microsoft Knowledge Base:
How to back up and restore the registry in Windows
- Click Start

- In Start Search (Windows Vista) or Search programs and files (Windows 7) area, type in regedit, and press Enter.
- If prompted by UAC, click Continue (Windows Vista) or Yes (Windows 7).
- In Registry Editor, go to:HKEY_LOCAL_MACHINE\SOFTWARE\Microsoft\Windows NT\CurrentVersion\ProfileList
- In the left pane, look for the folder name starting with S-1-5 (SID key) followed by a long number. then click each folder and locate ProfileImagePath from the right pane, double click to verify that this is the user account profile that has the error.
- If you have two folders starting with S-1-5 followed by same long nubmers and one of them ended with .bak. Change the .bak folder to normal one. To do this, follow the steps below:
- Right click the folder without .bak and choose Rename. Then add .ba at the end of the folder name.

- Right click the folder with .bak and choose Rename. Then remove .bak at the end of the folder name.

- Right click the folder with .ba and choose Rename. Then change the .ba to .bak at the end of the folder name.

- Right click the folder without .bak and choose Rename. Then add .ba at the end of the folder name.
- If you have only one folder starting with S-1-5 followed by a long numbers and ended with.bak. Right click the folder and choose Rename. Then remove .bak at the end of the folder name.
- If you have two folders starting with S-1-5 followed by same long nubmers and one of them ended with .bak. Change the .bak folder to normal one. To do this, follow the steps below:
- Choose the folder without .bak, in the right pane, double click RefCount and type 0 and then clickOK.

- Choose the folder without .bak, in the right pane, double click State and type 0 and then click OK.

- Close Registry Editor.
- Restart the computer.
- Log on again with your account.
Method 2: Log on to Windows and copy your data to a new account
reate a new account and copy the data from the old account to the new account.Method 3: Delete the error SID and create a new profile
To delete the error SID and create a new profile, follow the steps below:
- Delete the error SID.
To have us fix this problem for you, go to the "Fix it for me" section. If you would rather fix it yourself, go to the "Let me fix it myself" section.Fix it for me
To fix this problem automatically , click the Fix this problem link. Then click Run in the File Downloaddialog box, and follow the steps in this wizard.
Note This wizard may be in English only; however, the automatic fix also works for other language versions of Windows.
Note If you are not on the computer that has the problem, you can save the automatic fix to a flash drive or to a CD, and then you can run it on the computer that has the problem.Let me fix it myself
Important This section, method, or task contains steps that tell you how to modify the registry. However, serious problems might occur if you modify the registry incorrectly. Therefore, make sure that you follow these steps carefully. For added protection, back up the registry before you modify it. Then, you can restore the registry if a problem occurs. For more information about how to back up and restore the registry, click the following article number to view the article in the Microsoft Knowledge Base:How to back up and restore the registry in Windows
To resolve this problem yourself, follow these steps:- Delete the profile by using the Computer Properties dialog box. To do this, follow these steps:
- Click Start, right-click Computer, and then click Properties.
- Click Change settings.
- In the System Properties dialog box, click the Advanced tab.
- Under User Profiles, click Settings.
- In the User Profiles dialog box, select the profile that you want to delete, clickDelete, and then click OK.
- Click Start, type regedit in the Start search box, and then press ENTER.

- Locate and then expand the following registry subkey:HKEY_LOCAL_MACHINE\SOFTWARE\Microsoft\Windows NT\CurrentVersion\ProfileList
- Right-click the SID that you want to remove, and then click Delete.
- Delete the profile by using the Computer Properties dialog box. To do this, follow these steps:
- Log on to the computer and create a new profile.
References:

