Page List

21 December 2011

Clear Recent Commands From the Run Dialog in Windows XP


Has it ever bothered you that there isn’t an obvious way to remove the previous items in the Run box in Windows? It’s often very useful, of course… but if you are just a little bit paranoid you might want to clean out that list on occasion.
Of course there are many cleaner applications that will do this for you, but we’ll explain how to do it manually.


Clear Recent Run Dialog Entries Through Regedit
Open up regedit.exe through the start menu run box, and then navigate down to the following key:
HKEY_CURRENT_USER\Software\Microsoft\Windows\CurrentVersion\Explorer\RunMRU


You’ll see all your recent commands on the right, and you can delete any of the keys that contain your commands. You’ll have to logoff and then back on, but the list should be clean.
Note that this will also work for Windows Vista’s Run dialog, although most people have switched to using the search box instead.

Completely Clear Recent Run Dialog Entries The Easier Way
Reader Ayush pointed out a much more easy solution that this registry hack-happy geek overlooked.
Right-click on the taskbar and choose Properties, then choose Start Menu.


Select the “Classic Start menu” option, and choose the Customize button. (Don’t worry, we’ll cancel out of the dialogs so you can keep the XP menu style)
Now just click the Clear button to remove all of the recent documents and applications from the start menu.


Once you’ve done that, hit Cancel and then Cancel again to make sure you don’t switch to the Classic Start menu.
Note that this method will clear out everything… so if you just want to remove a single entry you need to use the registry hack method.


References: http://www.howtogeek.com/howto/windows/clear-recent-commands-from-the-run-dialog-in-windows-xp/

30 November 2011

Fix Temporary Profile in Windows 7 (Error message: "The User Profile Service failed the logon. User profile cannot be loaded”)


If you get a message you have been logged into a temporary profile in Windows 7 computer, then it’s not your correct profile. You may miss your icons on desktop, any customized settings in Windows 7 by this temp profile issue. This post explains how easily you can fix temporary profile in Windows 7 issue.
By restarting or re logging to Windows 7 computer will not help you in this case. This temp profile issue rises because of a registry key.

Fix Temporary Profile in Windows 7 Issue

1)      Log in with temp profile.
2)      Start registry editor by typing regedit in find box in Windows 7.
3)      Navigate the following location in Windows 7.
Fix Temporary Profile in Windows 7
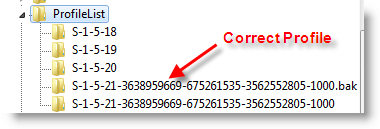
4)      You can see similar keys under profile list with .bak difference, as shown below.
Fix Temporary Profile in Windows 7
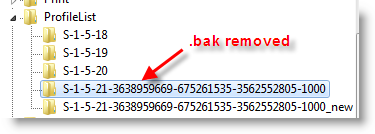
5)      Your correct profile key is marked as bak. Currently your Windows 7 computer logged in with fresh profile with same key. So, rename the new profile key ( which is not having.bak) and remove .bak from correct profile key. See below.
Fix Temporary Profile in Windows 7
6)      That’s it. Log off and log in with your user name and password. You must get your icons and profile settings back in Windows 7. This is very simple and easy method to fix temp profile in Windows 7  issue. 

Method 1: Fix the User Account Profile

To do this, follow the steps below:

Important This section, method, or task contains steps that tell you how to modify the registry. However, serious problems might occur if you modify the registry incorrectly. Therefore, make sure that you follow these steps carefully. For added protection, back up the registry before you modify it. Then, you can restore the registry if a problem occurs. For more information about how to back up and restore the registry, click the following article number to view the article in the Microsoft Knowledge Base:
How to back up and restore the registry in Windows
  1. Click Start
  2. In Start Search (Windows Vista) or Search programs and files (Windows 7) area, type in regedit, and press Enter.
  3. If prompted by UAC, click Continue (Windows Vista) or Yes (Windows 7).
  4. In Registry Editor, go to:
    HKEY_LOCAL_MACHINE\SOFTWARE\Microsoft\Windows NT\CurrentVersion\ProfileList
  5. In the left pane, look for the folder name starting with S-1-5 (SID key) followed by a long number. then click each folder and locate ProfileImagePath from the right pane, double click to verify that this is the user account profile that has the error.
    Expand this image
    • If you have two folders starting with S-1-5 followed by same long nubmers and one of them ended with .bak. Change the .bak folder to normal one. To do this, follow the steps below:
      1. Right click the folder without .bak and choose Rename. Then add .ba at the end of the folder name.
      2. Right click the folder with .bak and choose Rename. Then remove .bak at the end of the folder name.
      3. Right click the folder with .ba and choose Rename. Then change the .ba to .bak at the end of the folder name.
    • If you have only one folder starting with S-1-5 followed by a long numbers and ended with.bak. Right click the folder and choose Rename. Then remove .bak at the end of the folder name.
  6. Choose the folder without .bak, in the right pane, double click RefCount and type 0 and then clickOK.
  7. Choose the folder without .bak, in the right pane, double click State and type 0 and then click OK.
  8. Close Registry Editor.
  9. Restart the computer.
  10. Log on again with your account. 

Method 2: Log on to Windows and copy your data to a new account

reate a new account and copy the data from the old account to the new account. 

Method 3: Delete the error SID and create a new profile


To delete the error SID and create a new profile, follow the steps below:
  1. Delete the error SID.
    To have us fix this problem for you, go to the "Fix it for me" section. If you would rather fix it yourself, go to the "Let me fix it myself" section.

    Fix it for me

    To fix this problem automatically , click the Fix this problem link. Then click Run in the File Downloaddialog box, and follow the steps in this wizard.
    Fix this problem
    Microsoft Fix it 50446

    Note This wizard may be in English only; however, the automatic fix also works for other language versions of Windows.

    Note If you are not on the computer that has the problem, you can save the automatic fix to a flash drive or to a CD, and then you can run it on the computer that has the problem.

    Let me fix it myself

    Important This section, method, or task contains steps that tell you how to modify the registry. However, serious problems might occur if you modify the registry incorrectly. Therefore, make sure that you follow these steps carefully. For added protection, back up the registry before you modify it. Then, you can restore the registry if a problem occurs. For more information about how to back up and restore the registry, click the following article number to view the article in the Microsoft Knowledge Base:
    How to back up and restore the registry in Windows

    To resolve this problem yourself, follow these steps:
    1. Delete the profile by using the Computer Properties dialog box. To do this, follow these steps:
      1. Click Start, right-click Computer, and then click Properties.
      2. Click Change settings.
      3. In the System Properties dialog box, click the Advanced tab.
      4. Under User Profiles, click Settings.
      5. In the User Profiles dialog box, select the profile that you want to delete, clickDelete, and then click OK.
    2. Click Start
      the Start button
      , type regedit in the Start search box, and then press ENTER.
    3. Locate and then expand the following registry subkey:
      HKEY_LOCAL_MACHINE\SOFTWARE\Microsoft\Windows NT\CurrentVersion\ProfileList
    4. Right-click the SID that you want to remove, and then click Delete.
  2. Log on to the computer and create a new profile. 

References


19 October 2011

How To Install Acronis TrueImage Version 10 on Windows 7

Many consider TrueImage 10 build 4942 to be the best release of TI to date. Subsequent versions like TI 11, TI 2009, and TI 2010 have introduced more features and along with them, more bugs. Those who want only basic imaging capabilities can't go wrong with Version 10. However, if you install version 10 on Windows 7 then you are greeted with the following compatibility warning when starting the program:


The purpose of this article is to present a solution to allow version 10 to work with Windows 7.

Warning: Do this at your own risk. While I haven't had any problems using Version 10 with Windows 7 RTM, that doesn't mean that they don't exist. The program was added to the list of blocked programs by Acronis for one of two reasons; first, because it may have technical incompatibilities with Windows 7, or second, because the program is old, no longer supported, and Acronis does not want to invest software resources to fix it but instead wants to sell you the newest version. While the latter is probably the reason for adding TI 10 to the blocked programs list, there are no guarantees that it isn't the former. And if there are technical issues, then data loss may occur.

Known issues with Version 10
Longtime users of version 10 are well aware of its limitations, but to recap:
1. All version of TI to date will create partition table entries using the established 63-sector offset rules where the first partition starts at sector 63 and all partitions start and end on multiples of 63 sectors and the sizes of partitions are a multiple of 63 sectors. If you restore a Vista or Windows 7 partition that was created by the Vista/Win 7 installer or by Vista/Win 7 Disk Management, both of which use the newer 2048-sector offset rules, then the partition will be realigned to 63-sector offset by TI upon restoration. This realignment will prevent Vista/Win 7 from booting until the Boot Configuration Database (BCD) is repaired. Newer TI versions automatically correct the BCD but Version 10 does not. If you use Version 10 with Vista/Win 7, then you need to have a Vista/Win 7 DVD available to repair the BCD, or else you need to generalize the BCD before imaging. Some PC manufacturers do not furnish original OS installation media, so before you use TI 10, make sure that you have a viable means of recovery. You can borrow a Vista/Win 7 DVD to use for repairs, or you can make your own recovery CD with Windows 7 by typing System Repair Disk into the Win 7 START search box and following the wizard.

2. When restoring Windows XP partitions, version 10 has the annoying habit of rearranging the order of entries in the partition table so that the restored XP partition is in the "slot" corresponding to its boot.ini entry. This was done so that a WinXP partition could be restored to a different location on the disk without the need to manually edit the boot.ini file. It also finds any other installations of WinXP on other partitions and modifies their boot.ini files. The result is that you can end up with a partition table where the entries are not in disk order, or what is referred to as a "Scrambled" partition table. This is mainly a cosmetic issue and does not affect the ability of the partition table to work correctly.

3. The Linux recovery environment will sometimes corrupt NTFS files that are restored to a different location on the disk in very specific circumstances (the files contain NTFS Alternate Data Streams). This is not an issue when cloning or when creating or restoring partition or disk images, and is never an issue when restoring individual files and folders from the Windows environment. It's only an issue when restoring individual files or folders from the boot CD.
There may be others that I've missed, but these were the big ones.

What I've Tested with Windows 7

I've had TI 10 build 4942 installed and working in Windows 7 x64 since early October and have been using it successfully since then. I have tested the following features with success:
1. Creating images from within Windows, including full, incremental, and differential
2. Mounting images created by TI 10
3. Exploring images with Windows Explorer
4. Validating image archives
5. Scheduling automatic image creation with the built-in Acronis scheduler
6. Restoring Windows 7 partitions from the TI recovery environment.

What I have not Tested with Windows 7

1. Initiating a restore operation while running Windows 7
2. Activating the ASRM
3. Creating a Secure Zone
4. Backing up and restoring individual files and folders
5. Using any of the other "bells and whistles" of the program.

How to Unblock the Program

Uninstall any version of TI that is currently installed on the disk and then install TI version 10. When you try to run the program the Windows 7 Program Compatibility Assistant will run and will check the name of the program against a list of blocked software. If the program is on the list, it will be blocked from execution. However, if you change the name of the executable, it will not be found on the list and will not be blocked. For TI version 10, the program's name is TrueImage.exe. Change it to something else; for example, TI.exe, to avoid being blocked. You must change the name in two places; first, in the Program Files folder, and second, in the registry. Changing the entry in the registry allows the right-click context menus to link to the new name of the program. The following are specifics for both 32-bit and 64-bit Windows 7.

32-bit Win 7:

1. Change the name of the executable program in C:\Program Files\Acronis\TrueImageHome\ from TrueImage.exe to TI.exe
2. Change the path to the executable program in the registry at this key:
HKey_Local_Machine\Software\Acronis\TrueImageHome\Settings\MainExePath
Change the path to match the name in step 1, i.e. to
C:\Program Files\Acronis\TrueImageHome\TI.exe

64-bit Win 7:

1. Change the name of the executable program in C:\Program Files (x86)\Acronis\TrueImageHome\ from TrueImage.exe to TI.exe
2. Change the path to the executable program in the registry at this key:
HKey_Local_Machine\Software\Wow6432Node\Acronis\TrueImageHome\Settings\MainExePath
Change the path to match the name in step 1, i.e. to:
C:\Program Files (x86)\Acronis\TrueImageHome\TI.exe

Disclaimer

I had initially resisted requests to post this information. However, TI version 10 is an old program and Acronis no longer supports it. The last update was March 12, 2007 and the program has now been superceded by 3 newer releases, so by now version 10 can be considered to be obsolete. I don't see any harm in posting this information. But use this workaround at your own risk.

NOTE: The procedure below is required for TI 10 and earlier to be able to restore a Vista partition so that it does not require a repair. If you are using a version of TI later than 10 (TI 11, TI 2009, etc.), these changes are not needed as TI will make the necessary changes to the BCD file during the restore. However, if you wish to make the changes anyway to generalize Vista’s BCD entry so that it will boot from the Active partition (in preparation for duplicating a Vista partition, for example), the changes can be applied.

If you have a Vista system that is installed to a Vista created partition, then most of you know that you have to restore the entire drive in order to avoid a repair. Restoring just the Vista partition will require a repair the first time it's restored. This is very undesirable, especially for those without a Vista DVD or BartPE CD.

Mark (K0lo) has forwarded information to me along the same lines as what I was working on with repairing Vista using BartPE. (Thanks, Mark.) My method of repairing a Vista restore using BartPE can be found in this thread: How To Question - Restore and Eliminate one Partition starting at Post #14.

I have tested this procedure with an image restore using both BartPE and the Full (Linux) version of TI (version 10, build 4,942) and they both restored a Vista created partition without needing to be repaired. Others have reported success with cloning.

To prepare your Vista BCD file, start a Command Prompt in administrative mode (browse to the Command Prompt menu item, right-click and select Run as administrator):

Name:  cmd_adm.jpg
Views: 9790
Size:  12.6 KB

If the Command Prompt directory is not the \windows\system32 directory then type the following commands (<ENTER> means to press the ENTER key):
Code:
c: <ENTER> cd \windows\system32 <ENTER>
If your Vista partition is a drive letter other than C: then use that drive letter.

Once you're in the \windows\system32 directory, type the commands below:
Code:
bcdedit /set {default} device boot <ENTER> bcdedit /set {default} osdevice boot <ENTER> bcdedit /set {bootmgr} device boot <ENTER> bcdedit /set {memdiag} device boot <ENTER>
This assumes that the "default" booting entry in the BCD file is Vista.
After these changes, your bcdedit output will resemble this:
Code:
Windows Boot Manager -------------------- identifier {bootmgr} device boot description Windows Boot Manager locale en-US inherit {globalsettings} default {default} displayorder {default} toolsdisplayorder {memdiag} timeout 30 Windows Boot Loader ------------------- identifier {default} device boot path \Windows\system32\winload.exe description Microsoft Windows Vista locale en-US inherit {bootloadersettings} osdevice boot systemroot \Windows resumeobject {d5f6f061-52c6-11dc-8f68-ff6d008c462c} nx OptIn

instead of referencing a partition directly as in the example below:
Code:
Windows Boot Manager -------------------- identifier {bootmgr} device partition=C: description Windows Boot Manager locale en-US inherit {globalsettings} default {default} displayorder {default} toolsdisplayorder {memdiag} timeout 30 Windows Boot Loader ------------------- identifier {default} device partition=C: path \Windows\system32\winload.exe description Microsoft Windows Vista locale en-US inherit {bootloadersettings} osdevice partition=C: systemroot \Windows resumeobject {d5f6f061-52c6-11dc-8f68-ff6d008c462c} nx OptIn

Now, if you clone the Vista partition or image it and restore it, you should not have to run a repair. It should boot up properly.

I would be interested to hear any comments on this procedure.

---

Note: I tested this procedure on a clean install of Vista Ultimate. There were no "recovery" partitions or "media direct" partitons, etc. If you are unsure about doing this procedure, I would recommend that you create an Entire Disk image (check the Disk # checkbox) before you make these changes. Then proceed to make the changes, then clone or reimage and restore. If it works properly, you can delete the backup images as you see fit.

References:
http://forum.acronis.com/forum/5908
http://www.wilderssecurity.com/showpost.php?p=1078316&postcount=1


12 October 2011

Windows 8 Developer Preview


The developer preview is up for grabs now on the newly launched Developer site.There are two kinds of builds available over the Developer site.First is with Developer tools and a 64 Bit version while the other version is Without the Developer tools in 32 bit as well as 64 bit version.
Here are the details of the Developer Builds that are up now on the site dev.windows.com

Windows Developer Preview with developer tools English, 64-bit (x64)

  • 64-bit Windows Developer Preview
  • Windows SDK for Metro style apps
  • Microsoft Visual Studio 11 Express for Windows Developer Preview
  • Microsoft Expression Blend 5 Developer Preview
  • 28 Metro style apps including the BUILD Conference app

Windows Developer Preview English, 64-bit (x64)

Includes a disk image file (.iso) to install the Windows Developer Preview and Metro style apps on a 64-bit PC.

Windows Developer Preview English, 32-bit (x86)

Includes a disk image file (.iso) to install the Windows Developer Preview and Metro style apps on a 32-bit PC.

References: http://www.cybermania.ws/windows-8-developer-preview/


09 October 2011

Steve Job - He did not.


  • Steve Jobs did not create products. He created an organization that predictably and reliably created emotionally resonant products.
  • Steve Jobs did not make movies. He made a company that predictably and reliably made blockbusters.
  • Steve Jobs did not wrest market share from competitors. He created new markets that attracted and sustained competitors.
  • Steve Jobs did not design anything. He gave others the freedom to think about what jobs products are hired to do.
  • Steve Jobs did not re-engineer processes. He brought engineering processes to works of creativity and the creative process to engineering.
  • Steve Jobs did not develop new management theories. He showed by example that innovation can be managed.
  • Steve Jobs was not a visionary. He put the dots together and saw where they led.
  • Steve Jobs was not a futurist. He just built the future one piece at a time.
  • Steve Jobs did not distort reality. He spoke what he believed would become reality at a time when those beliefs seemed far fetched.
  • Steve Jobs was not charismatic. He spoke from the heart compelling others to follow him.
  • Steve Jobs was not a gifted orator. He spoke plainly.
  • Steve Jobs was not a magician. He practiced, a lot.
He had taste.
He was curious.
He was patient.
He was foolish.
He was hungry.
These things many others can do. Maybe you can.

by Horace Dediu


11 September 2011

游澳洲省钱妙招,我不是教你诈


澳币日渐升值,对于预算有限的背包客来说,去澳大利亚旅行是一笔不小的开支。拜廉价航空所赐,来往澳大利亚的机票不贵,但是在澳大利亚的衣食住行,加总起来,开销还是不小。如何在澳大利亚玩得开心,钞票花得值得,以下的省钱招数供你参考。

购物省钱法

目前澳洲最流行的是网络购物潮流,你若稍加留意,即可省下一笔。这里的团购非常发达,小至蔬菜水果,大至家电汽车等都可以在网上团购解决。对于游客来说,最实用的当然是超值的美食餐券和国内旅游配套。澳洲著名的团购网有Scoopon、Stardeal和Livingsocial等,除了可上网游览,还可以下载智慧型手机版、加入会员等以第一时间获取最新好康资讯。笔者最常光顾的团购网站是Allthedeals 。这网站更新频繁,而且国内其它团购网的资讯都可在这网站找到,使用起来非常方便。我曾经以AUD1买了一杯咖啡另加一块蛋糕,并以AUD39吃了一顿两人的高级法国料理。至于旅游配套,你可以以超过五折的价钱买到便宜的4-5星酒店配套,对背包客来说这绝对是个佳音!

悉尼歌剧院。

交通省钱法

澳洲的公共交通真的不便宜,花在交通上的费用甚至是占了行程预算的大部分。阿德莱德的公交是互通的,一旦买了单程票(AUD4.60),就可在两个小时内任搭阿德雷德的所有公交。嫌太贵?那在非高峰时段(off peak hour)上车就行可节省一半费用!非高峰时段为9am-3pm,票价为AUD2.80。另外,可考虑购买Multitrip Metro Ticket(AUD30),可以乘搭公交10次,或游客全日票(AUD8.60)。学生证持有者可买优惠票(Consession Card,AUD14.90)。其实,很多“冒牌学生”为了省钱而冒险一搏买学生优惠卡。用不用此招,你自己斟酌。
墨尔本Flinders Station。
墨尔本的电车举世闻名,但是票价却不见得便宜。单程Zone 1的票价是AUD3.80。和阿德莱德的电车一样,买了票可在两个小时内任搭。如果只坐3-4站,一般上我都不买票。由于持月票的乘客在上车的时候不需要打卡,没票也真的没人理会。我在墨尔本的时候几乎没碰过查票员。有一次在市区内的Flinders Station遇上了,但当时我有买全日票,所以“逃”过了! 到了市区内就可以转搭古老的免费电车在市区趴趴走。墨尔本市区不大,步行半天就可逛完,因此,基本上可以不搭公交。又,用不用此招,你自己斟酌。

悉尼是澳洲第一大城市,消费也是澳洲第一的。火车和巴士服务不象阿德莱德和墨尔本有两个小时任搭的服务。各种交通也没有互通,都是独立收费的。除非你是买全日票(AUD20,这价格还不包括私人经营的电车),不然,要在悉尼省钱,唯一的办法就是乘搭免费的555号巴士。此巴士穿行Circular Quay、 商业区和唐人街等。当然,步行也是方法之一。虽说悉尼是澳大利亚第一大城,但其实也不大。慢慢走的话,一天内就可以走完悉尼了。晚上9点后,火车站内就没有工作人员了。他们会开一个出口让乘客自由进出,所以你不用买票就可以任意使用到服务打烊。用不用此招,随你!

填肚省钱法

如果你会下厨,那就可以节省一点,尽管澳大利亚的食材也不便宜。如果只有你一个人,那最好的方法就是去超级市场买现成食物。超市要打烊前的一到两个小时,大部分熟食都会以半价出售。Coles和Woolworth这两大超市会给予即将到期(但还是很新鲜)的食物打折,可以在超市里慢慢搜寻。
悉尼的帕丁顿市场(Paddington Market)。
一般中餐(两菜一白饭)要AUD8,西餐则AUD12-20不等,这个价钱不包括饮料。要省钱就不要叫饮料。一杯普通咖啡或汽水大约AUD3.50。澳大利亚的水质非常卫生,餐座上如摆放着table water的话,就别客气了。
想吃便宜快餐有妙招!以Hungry Jack为例,到柜台点餐的时候,和服务员说你要“Stunner meal”(这个套餐是不在他们的餐牌里的)你就可以以AUD4.90买到一个芝士汉堡+汽水+薯条+一杯圣代,保证划算!在肯德基,就叫“Street Wise Meal”,包括两块炸鸡、薯条和一罐汽水,价格为AUD5.90,便宜了一半!只要开口,就可以超值价格饱吃一餐!

住宿省钱法

在澳大利亚想找一家即便宜又舒适酒店,难如登天。入住背包客栈之前,一定要上网搜寻一下住客对客栈的评语。YHA的旅社基本上都比较卫生,背包客的素质也不错。如果双人同行,那建议你去团购网购买酒店配套。我曾以AUD129买下三天两夜的Victor Harbour Resort的酒店配套,还包早餐。我们一间房还住了三个人,只要不太张扬,酒店是不会干涉的。
想尝试驾驶多功能房车(Camper Van)旅行却负担不起的话,可游览Transfercar网站搜寻便宜甚至免费的租车行程!有些行程甚至包括免费保险和汽油。为什么如此好康?其实是租车公司想雇用你把车子从一个地方驾到另一个地点,是双赢的办法!

其它贴士:

·澳大利亚地大,不同区域有着不一样的天气。记得随时携带一件耐寒耐风的jumper。
·澳大利亚的太阳猛烈,出门前一定要做足防晒功夫。这里的空气也比较干,唇膏和润肤液不可少。
·澳大利亚分维多利亚,新南威尔,南澳,昆士兰,西澳,北方领土和塔斯马尼亚七个州属。每一个州属的交通和法律都不一样。
·如果需要跨州旅行,必须事先上网查询当地的法律。例如,飞往南澳和塔斯马尼亚,尽管是内陆班机,乘客是不准携带新鲜食物如水果肉类入境的。
·穷则变,变则通,要省钱,还得在必要的时候适当取巧。我不是教你诈,我的省钱妙计,如果你口袋里有钱,那就留着以后没钱的时候再用也不迟。

更多游记刊登于《大脚印》网站。《大脚印》旅游网(www.bigfoottraveller.com)是《独立文化志》的策略伙伴。《大脚印》秉持着“真实、公正、实用”的原则,透过个人化的游记和旅游路线让读者得到贴心、准确、透明化的旅游必知。

【大脚印/Winson金乐】

Referenceshttp://merdekareview.com/news_v2.php?n=20172


21 August 2011

Microsoft Office 2010 Professional Plus SP1


Microsoft Office 2010 is one of the best productivity experiences across the PC, phone, and browser for what you depend on today and what you’ll expect tomorrow. It helps you rise to the challenge of today’s business environment without losing sight of what’s needed for IT success.
Microsoft has officially released the first service pack (SP1) for Office 2010 productivity suite. The Office 2010 SP1 includes the roll-up of all previously released updates, in addition to several new updates which improve security, performance, and stability.
Here’s the official download pages and direct download links for Office 2010 SP1. The SP1 will be available through Windows Update and Microsoft Update, automatically for people with Automatic Updates turned on, although the update will be at later date.
The Office 2010 SP1 is released as KB2460049.
32-bit (x86) Office 2010 SP1
64-bit (x64) Office 2010 SP1
Note that you have to download the correct version of 32-bit or 64-bit that matches the installed Office 2010 product, and not Windows operating system. For compatibility, Microsoft has recommended most users to install 32-bit version of Office 2010 even though they have 64-bit Windows 7 or Vista.
To check if you have x86 or x64 version of Office 2010, just run any Office application such as Excel, Word, PowerPoint, Outlook and etc, and go to File menu to select Help. The 32-bit or 64-bit version of the Office product will be listed under the About section. Nonetheless, the Office 2010 SP1 setup installer is smart enough to detect the version of the installed Office applications and prevent installation from proceeding if the version is incorrect.

Serial : YGX6F-PGV49-PGW3J-9BTGG-VHKC6

20 August 2011

Microsoft Windows 7 SP1


windows-7
Windows 7 (formerly codenamed Blackcomb and Vienna) is the next release of Microsoft Windows, an operating system produced by Microsoft for use on personal computers, including home and businessdesktops, laptops, Tablet PCs, and media center PCs.
Microsoft stated in 2007 that it is planning Windows 7 development for a three-year time frame starting after the release of its predecessor, Windows Vista, but that the final release date will be determined by product quality.
Unlike its predecessor, Windows 7 is intended to be an incremental upgrade with the goal of being fully compatible with existing device drivers, applications, and hardware. Presentations given by the company in 2008 have focused on multi-touch support, a redesigned Windows Shell with a new taskbar, a home networking system called HomeGroup, and performance improvements. Some applications that have been included with prior releases of Microsoft Windows, most notably Windows Mail (formerlyOutlook Express), Windows Movie Maker, and Windows Photo Gallery, are no longer included with the operating system; they are instead offered separately as part of the Windows Live Essentials suite.
Windows 7 – It’s the next version of Windows for PCs, and it’s the result of working hand-in-hand with our partners and with people who use Windows in the real world every day. We’re paying particular attention to the things they’re telling us are important to them and will make their PCs work the way they want them to – things like enhanced reliability, responsiveness, and faster boot and shut-down. We’re also trying to make their everyday tasks easier, like connecting and syncing devices, browsing the web, and managing a home network.
Of course, we’re also working on new capabilities, so people will be able to do things with Windows 7 that were difficult (or perhaps impossible) to do with PCs before. Finally, we’re working hard to ensure that Windows 7 will run on any PC and work with any program that works today with Windows Vista, so upgrading from Windows Vista will be easy.
FEATURES:
Windows 7 includes a number of new features, such as advances in touch, speech, and handwriting recognition, support for virtual hard disks, improved performance on multi-core processors, improved boot performance, and kernel improvements.
According to reports sent to TG Daily, the Milestone 1 build of Windows 7 adds support for systems using multiple heterogeneous graphics cards from different vendors and a new version of Windows Media Center. New features in Milestone 1 also reportedly include Gadgets being integrated into Windows Explorer, a Gadget for Windows Media Center, the ability to visually pin and unpin items from the Start Menu and Taskbar, improved media features, the XPS Essentials Pack being integrated, Windows PowerShell Integrated Scripting Environment (ISE), and a multiline Calculator featuring Programmer and Statistics modes along with unit conversion.
Reports indicate that a feedback tool included in Milestone 1 lists some coming features: the ability to store Internet Explorer settings on a Windows Live account, updated versions of Paint and WordPad, and a 10-minute install process. In addition, improved network connection tools might be included.
Many new items have been added to the Control Panel including: Accelerators, ClearType Text Tuner, Display Color Calibration Wizard, Gadgets, Infrared, Recovery, Troubleshooting, Workspaces Center, Location and Other Sensors, Credential Manager, Biometric Devices, System Icons, Windows Solution Center, and Display. Windows Security Center has been renamed the Windows Solution Center (Windows Health Center in earlier builds) which encompass both security and maintenance of the computer.
The taskbar has seen the biggest visual changes, where the Quick Launch has been merged with the buttons to create an enhanced taskbar or what Microsoft internally refers to as the “Superbar”. This enhanced taskbar also enables the Jump Lists feature to allow easy access to common tasks.
According to released PDC 2008, which was held 27-30 October 2008, session information, Windows 7 discussions will cover “enhancements to the taskbar, Start Menu, thumbnails and their desktop elements”, a new networking API with support for building SOAP based web services in native code (as opposed to.NET based WCF web services), new features to shorten application install times, reduced UAC prompts, simplified development of installation packages,[56] and improved globalization support through a new Extended Linguistic Services API. Windows 7 will also contain a new FireWire (IEEE 1394) stack that fully supports IEEE 1394b with S800, S1600 and S3200 data rates.
At WinHEC 2008 Microsoft announced that color depths of 30-bit and 48-bit would be supported in Windows 7 along with the wide color gamut scRGB (which for HDMI 1.3 can be converted and output as xvYCC). The video modes supported in Windows 7 are 16-bit sRGB, 24-bit sRGB, 30-bit sRGB, 30-bit with extended color gamut sRGB, and 48-bit scRGB.
With the release of Windows 7 SP1, Microsoft has also updated the Windows 7 DVD media ISO image distributed by Digital River for online order fulfillment. Digital River is Microsoft’s partner for fulfillment on online distribution for downloadable Microsoft products.
The Windows 7 ISO images hosted on Digital River is genuine and official version, and the downloads from the server is legal. It’s after all one of the official channel where end-users who purchase a license (product key) for Windows 7 get the setup installation files.
Anyway, without a genuine and legally purchased product key, you can’t get Windows 7 activated, and Windows 7 will only run as evaluation copy for up to 30 days.
The latest version of Windows 7 DVD image available is of media refresh version, which commonly known as Windows 7 SP1-U (Media Refresh). Microsoft released the media refresh version of Windows 7 DVD media to fix a rare bug related to invalid computer name when small set of computer names returned error when used to install Windows 7. Otherwise, the Windows 7 with SP1 and Windows 7 with SP1-U (Media Refresh) is completely the same.

Download Windows 7

Windows 7 Ultimate SP1-U ISO
English x86:X17-59463.iso
English x64:X17-59465.iso
French x86:X17-59477.iso
French x64:X17-59479.iso
Spanish x86:X17-58877.iso
Spanish x64:X17-58879.iso
Windows 7 Professional SP1-U ISO
English x86:X17-59183.iso
English x64:X17-59186.iso
German x86:X17-59886.iso
German x64:X17-59885.iso
French x86:X17-59195.iso
French x64:X17-59197.iso
Spanish x86:X17-58866.iso
Spanish x64:X17-58868.iso
Italian x86:X17-59212.iso
Italian x64:X17-59215.iso
Portuguese x86:X17-59246.iso
Portuguese x64:X17-59247.iso
Swedish x86:X17-59271.iso
Swedish x64:X17-59273.iso
Norwegian x86:X17-59229.iso
Norwegian x64:X17-59231.iso
Finnish x86:X17-59192.iso
Finnish x64:X17-59194.iso
Dutch x86:X17-59233.iso
Dutch x64:X17-59236.iso
Danish x86:X17-59891.iso
Danish x64:X17-59883.iso
Traditional Chinese x86:X17-59295.iso
Traditional Chinese x64:X17-59297.iso
Korea x86:X17-59299.iso
Korea x64:X17-59300.iso
Windows 7 Professional N SP1-U ISO (Note: N editions come without media components)
English x86:X17-59335.iso
English x64:X17-59337.iso
German x86:X17-59323.iso
German x64:X17-59327.iso
French x86:X17-59348.iso
French x64:X17-59351.iso
Spanish x86:X17-58871.iso
Spanish x64:X17-58874.iso
Italian x86:X17-59364.iso
Italian x64:X17-59366.iso
Portuguese x86:X17-59395.iso
Portuguese x64:X17-59398.iso
Swedish x86:X17-59418.iso
Swedish x64:X17-59424.iso
Norwegian x86:X17-59380.iso
Norwegian x64:X17-59383.iso
Finnish x86:X17-59344.iso
Finnish x64:X17-59346.iso
Dutch x86:X17-59384.iso
Dutch x64:X17-59387.iso
Danish x86:X17-59318.iso
Danish x64:X17-59320.iso
Windows 7 Home Premium SP1-U ISO
English x86:X17-58996.iso
English x64:X17-58997.iso
Spanish x86:X17-58857.iso
Spanish x64:X17-58859.iso
French x86:X17-59007.iso
French x64:X17-59009.iso


Serial : 22TKD-F8XX6-YG69F-9M66D-PMJBM

Related Posts Plugin for WordPress, Blogger...