Page List

03 November 2012

How to Uninstall Windows 8, Windows 7 or Any Other Version of Windows


Some people sent us messages asking how they can remove the test versions of Windows 8 they installed or even older versions of Windows, such as Windows Vista or Windows 7. It doesn’t matter what versions of Windows you have, the procedure for uninstalling one of them is the same and I will share it in this article. Two scenarios are covered: how to remove one version of Windows when you have multiple installations of Windows on your computer and how to remove Windows when it is the only operating system installed.

How to Remove a Version of Windows in a Dual or Multi Boot Scenario

Let’s assume you installed a test version of Windows 8, like Windows 8 Release Preview in a dual-boot setup with Windows 7. Now you want to remove the test version of Windows 8 and install the final version of Windows 8 or simply use the space occupied by it for something else. How is this done?

Step 1. Backup Your Data

First, make sure you backup any important data you have on the partition where you installed the Windows version you want to remove. You will lose it if you don’t do it now, while that operating system exists and works well.

Step 2. Remove the Boot Entry for the Windows You Want Removed

Now it is time to remove the boot entry for the operating system you want to remove (in my example - Windows 8 Release Preview). Do this from the version of Windows you want to keep - in my case Windows 7.
Boot to the operating system you want to keep and launch the System Configuration tool in Windows or any other manager for boot entries that is compatible with all the operating systems you have installed.

If the version of Windows you are about to remove was set as the default boot operating system, change the default to the operating system you want to keep. This is done by selecting the Windows you want to keep and pressing "Set as default".
Select the Windows version you want removed, press Delete and then OK.
To test if everything is OK with the version of Windows you want to keep, restart the computer and see if you can boot it without problems. You should be able to. In case you can’t, you can repair its boot entry using the installation disc. We have a great article sharing the system recovery tools you can use: An Overview of System Recovery Options for Windows 7.

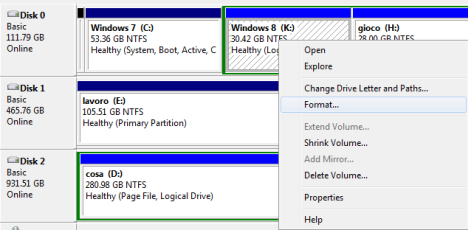
Step 3. Format The Partition Used by the Windows You Want Removed

Next, you should format the partition where you installed the Windows version you want removed. This, if you plan to reuse that partition to install another operating system.
If you would rather use that space to extend other partitions, right click on it and select Delete Volume to delete that partition. Then, the available empty space can be added to other partitions. For this job, you can use the Disk Management tool in Windows. We have a complete guide on how to use it, here: How to Manage Your Disks using the Disk Management Utility.
I will assume you want to reuse the same partition for another operating system. For example, you remove Windows 8 Release Preview so that you can install the final version of Windows 8.
Open the Disk Management tool and select the partition that you will format.

Right click and select Format.

You can change the label and the file system if you want to. If not, leave the default values and click OK.

You are warned that you are about to erase all the data existing on that partition. If you backed up everything that was important to you, press OK.

You might be warned that the selected partition is in use. To force the format, press Yes and the format is done in a few seconds.

The version of Windows you wanted to uninstall is now removed.
NOTE: You can use any partition management tool to do this. I showcased the Disk Management tool just because you can find it in Windows and use it right away.

What If You Have Non-Microsoft Operating Systems Installed?

If you have a multi-boot setup that includes non-Microsoft operating systems, like Ubuntu Linux, the steps are the same. The only difference is that you need to use a different tool to remove the boot entry for the version of Windows you want removed, so that the entries for the non-Microsoft operating systems are not negatively impacted.
A tool that works well is EasyBCD 2.2. You can use also other tools you know of. Unfortunately I’m not an expert in using and configuring Linux or other non-Microsoft operating systems.

How to Remove Windows When Only One Version is Installed

If you installed just one Windows operating system, then the uninstallation is really simple. Take the installation disc of the operating system you want to use next, boot from it and, during the installation procedure, select the existing Windows partition and format it or delete it. Then, reuse that partition (or available empty space) as you see fit and install the new operating system.
Before you do this, make sure to backup all your important data.

Conclusion

As you can see from this guide, uninstalling Windows is easier than it seems. Anyone can do it if they pay attention to the steps detailed above.


References: http://www.7tutorials.com/how-uninstall-windows-8-windows-7-or-any-other-version-windows


02 November 2012

How to Dual Boot Windows 8 with Windows 7, Windows Vista or Windows XP


On the Internet you may find plenty of guides on how to install Windows 8 on your computer but very few guides on how to create a dual boot setup and have it run alongside Windows 7, Windows Vista or Windows XP. That’s why we decided to help users who want to create a multiboot setup and share the steps required to install Windows 8 alongside earlier versions of Windows. Don’t hesitate to read the whole article and save yourself from problems and issues.

Step 1. Learn About The New Windows 8 Boot Manager

First, you need to learn about the new boot manager included with Windows 8. It is one of the most important novelties in Windows 8. The new boot manager not only looks different but:
  • It is touch friendly and can be used easily on tablets and displays with touch;
  • It allows you to choose the default operating system to boot into after a set time;
  • It provides more tools and features than the boot managers of earlier versions of Windows;
  • It takes longer to load than other boot managers but facilitates a faster boot procedure for Windows 8. As you will experience yourself, Windows 8 has the fastest boot time of all versions of Windows;
  • If you choose to boot into Windows 7 or another previous version of Windows, it will reboot your system and load the boot manager appropriate for that version of Windows.

Since it is so different it is incompatible with the boot managers from earlier versions of Windows.

Step 2. Install Other Versions of Windows First - Leave Windows 8 Last

Since the Windows 8 boot manager is so different, in a multi-boot configuration, Windows 8 should always be installed last. If you install it first and then other versions of Windows, the new boot manager will be overwritten and you won’t be able to boot into Windows 8. Then, you need to repair the boot manager with the Windows 8 installation disc or use some third-party software to manage and fix your boot entries.
You can try EasyBCD 2.2 Beta which provides support for Windows 8. If you find other boot managers that work with Windows 8, don’t hesitate to share them in the comments.

Step 3. Create a Partition Just for Windows 8

Once you are done installing other versions of Windows, you should partition your hard drive and create a new partition just for Windows 8. Make sure that this partition is at least 20 - 25 GB in size. If you plan to install lots of applications in Windows 8, don’t hesitate to make the partition bigger.

There are many tools you can use to create this partition. If you prefer the tools included in Windows, then don’t hesitate to use the Disk Management tool. To learn how to use it, read this tutorial: How to Manage Your Disks using the Disk Management Utility.

Step 4. Install Windows 8

Only after you install the other versions of Windows and create the partition for Windows 8, go ahead and install Windows 8.
Get the installation disc, boot from it and start the Windows 8 setup. Follow our detailed installation guide: How to Install Windows 8 RTM on Your Computer.

For a multiboot setup, the steps are the same as in that guide. The only difference is that when you are asked to select where to install Windows 8, select the partition that you created and make sure you don’t select the partitions where other operating systems are installed.

Step 5: Customize the Default Boot Operating System

After you install Windows 8, it is set as your default boot operating system. If you plan to use it as your main operating system, that’s OK.
However, if you plan to use it as a secondary operating system, it is best to change the default. You can use the System Configuration utility in Windows to change the default boot operating system.

You can also use a third party tool like EasyBCD 2.2 Beta or the Windows 8 boot manager.

Conclusion

As you can see from this guide, installing Windows 8 alongside Windows 7, Windows Vista or Windows XP can be done with relative ease. However, you do need quite a bit of time to get everything done and you need to pay attention to the order in which operating systems are installed.


References: http://www.7tutorials.com/how-dual-boot-windows-8-windows-7-windows-vista-or-windows-xp


01 November 2012

Connect to a Windows Desktop from Ubuntu via Remote Desktop Connection


A useful feature of Windows is being able to connect to your desktop from another location to remotely manage your computer. While this functionality is native in Windows 7 and previous versions, it is not supported by default in many Linux distributions, including Ubuntu. However, using any of the tools available, you can connect to a Windows remote desktop with ease. This tutorial will show how.
NOTE: This tutorial works on Ubuntu 10.10 & 11.04.

Step 1: Enable Remote Connections for Windows 7

In order to allow other computers to connect remotely to your Windows 7 computer, you need to enable the Remote Desktop functionality. To learn how to do this, check out this tutorial: Enabling Remote Desktop Connections in Windows 7.

Step 2: Install a Remote Desktop Client - Our Choice: Remmina Remote Desktop Client

By default, Ubuntu doesn’t come with a remote desktop client which supports the Remote Desktop Protocol (RDP) used by Windows operating systems for remote connections. You need to install one of the clients available in the Software Center.
First, start the Ubuntu Software Center, by going to Applications -> Ubuntu Software Center. In the Get Software section, search for ’remote desktop’. You will see a list with many alternatives. For this tutorial, we preferred to choose Remmina Remote Desktop Client, a client which is very appreciated by the user community and is, at the same time, very versatile and easy to use.
To get it installed, select it and click Install.

You are asked for your password. Type it and click Authenticate.

NOTE: please keep in mind that, in order to install software, your user account needs to have administrative permissions. If you are set as a Desktop user, you cannot install any software.
Now the application is downloaded and installed. Wait until the procedure ends.

Step 3: Configure the Remote Desktop Session

Now it is time to start the Remmina Remote Desktop Client by going to Applications -> Internet.

Click on the New Connection button.

This opens the Remote Desktop Preference window, where you can configure the remote connection.
In the Profile section, type the name you want to use for the connection. It can be anything you wish.
Then, in the Basic tab, complete the IP address of the Windows computer in the Server field. Then, type the username and password you want to use to connect to the Windows computer. Be aware that the user needs to be defined on the Windows computer.
You can also set the Resolution you want to use for the connection and the Color depth.

NOTE: Selecting a larger desktop size and color depth can impact the performance of your remote desktop session. If you experience lag when connected to a remote desktop, try reducing the color depth or resolution.
If you want to share a folder existing on your Ubuntu computer with the Windows computer, simply check the Share folder box and select the folder you want to share from Ubuntu.
Also, for more advanced settings, go to the Advanced tab. There you can turn the sound on or off, share printers, disable clipboard synchronisation, etc.

Once you are done making all the settings, click on the Connect button. After a while, if the Windows computer is turned on, you should be connected to it.

Once you close the remote connection, Remmina Remote Desktop Client automatically saves it so that you will be able to reconnect at a later time, with a simple click on the connection name.

Conclusion

As you can see, the procedure is not really complicated. As long as you make the right settings and use a client which supports the RDP protocol, connecting remotely from Ubuntu to a Windows desktop is almost a trivial task.


References: http://www.7tutorials.com/connecting-windows-remote-desktop-ubuntu


31 October 2012

How to Do Math With Math Input Panel in Windows 7 & Windows 8


Math Input Panel is a great little application introduced with Windows 7 and included also in Windows 8. Its purpose is to use input devices such as touchscreens, external digitizers or even a mouse, to write mathematical formulas which are easily recognized and inserted into different types of documents. The formulas you write in Math Input Panel are inserted into documents in a completely editable form so that you can edit the output as you would edit any type of text. This can improve your productivity when creating documents or presentations with lots of mathematical formulas.
In this article I will share the list of applications that work with Math Input Panel and show the following: where to find Math Input Panel, how to use it in conjunction with other applications, how to correct a formula or equation and how to configure it.

Types Of Math & Applications Math Input Panel Work With

Math Input Panel works very well with US high school and college-level mathematics. This means it works with the following: arithmetic, calculus, functions, sets, set theory, algebra, combinatorics, probability and statistics, geometry, vectors, 3D analytic geometry, mathematical logic, axioms, theorems, definitions and applied mathematics. It doesn't work with other types of math nor with formulas from other domains such as chemistry.
NOTE: Math Input Panel can only insert mathematical formulas into programs that support the Mathematical Markup Language (MathML). MathML is supported by major office products such as OpenOffice.org, LibreOffice, Microsoft Office 2007, Microsoft Office 2010 and 2013, as well as by mathematical software products such as Mathematica. As a result, Math Input Panel works with all these programs.

Where To Find Math Input Panel in Windows 7

Math Input Panel can be found by opening the Start Menu and going to All Programs -> Accessories -> Math Input Panel.

For those of you who prefer the command line, you can start the application by running the 'C:\Program Files\Common Files\Microsoft Shared\Ink\mip.exe' file. Once you start the application, you will see a window similar to the one below.

Where To Find Math Input Panel in Windows 8

The Math Input Panel has remained unchanged in Windows 8, even though it has a different version. The looks are a bit different (because of the missing Aero interface in Windows 8). All the menus have the same options and the features included are the same as in Windows 7.

Its shortcut is found in the same location as in Windows 7. On the Start screen, right click or swipe from the bottom and then click or tap All apps. Then go to Windows Accessories and click or tap Math Input Panel.

Alternatively, you can search for the word math while on the Start screen and click or tap the appropriate search result.

In the next sections of this article, I will showcase how to use the Math Input Panel using the version existing in Windows 7.

How To Use Math Input Panel

In the middle of Math Input Panel, where it says 'Write math here', start writing your mathematical formula. Once you start writing, you can use the tools from the menu that appears on the right side of the window.

When done, click or tap Insert and the formula is automatically pasted in the document where you want to use it.

NOTE: if the formula is not automatically copied to the application where you need to insert it, don't worry. By default, Math Input Panel saves formulas in the clipboard. Simply use Paste (CTRL + V) in the other application and it will be inserted.
You can also see a demo of how this works in the video below: Math Input Panel & Office 2007

If you write multiple formulas in one session, you can go back to any of them using the History menu. Click or tap on History and select the previous formula you want to edit or insert again into the document.

Once the formula is loaded by Math Input Panel, edit it (if needed) and click or tap on the Insert to have it in your document.

How To Correct Formulas

When writing a formula, don't hesitate to use the tools available on the right side of the application. If you made a mistake, you can easily fix it using the Erase tool. Click or tap on it to erase the mistake.
There are scenarios when Math Input Panel doesn't recognize very well what you write. You can correct the way it interprets your writing by clicking or taping on 'Select and Correct'. Then, select the character you want to correct. A drop-down menu with possible correction options is shown. From that menu select the correct interpretation and resume your writing by clicking or tapping on Write.

How To Configure Math Input Panel

Math Input Panel offers few configuration options. All of them can be accessed from the Options menu. The options are self-explanatory and allow you to do things such as changing the position of the buttons, turning on and off the grid or showing on-screen keyboard buttons.

Conclusion

As you can see from this tutorial, Math Input Panel is a tool that’s simple and easy to use. It's main benefit is the fact that it speeds up the process of working with mathematical formulas. Instead of using the Microsoft Office Equation Editor and spend quite some time inserting and editing mathematical formulas, you can simply draw them in Math Input Panel and insert them in any document you need to.


References: http://www.7tutorials.com/do-math-easy-way-math-input-panel


30 October 2012

Take Screenshots with the Snipping Tool in Windows 7 & Windows 8


All of us have done our fair share of working with images. Both Windows 7 and Windows 8 offer an easy to use tool for taking more complex screenshots, named the Snipping Tool. In this tutorial I will share how to take screenshots using this tool, how to save, edit or email a shot, how to use the available markup tools and how to change the settings of the application.

Where to Find the Snipping Tool in Windows 7

Windows 7 offers numerous ways to get to the Snipping Tool. You can go to the Start Menu, chooseAccessories and then click Snipping Tool.

A second way is to type the word "snipping" in the Start Menu search box and click Snipping Tool.

Where to Find the Snipping Tool in Windows 8

In Windows 8, right click on the Start screen and click All apps. Then, go to Windows Accessories and you will find its shortcut there.

Obviously, you can type the word snip and the Start screen displays the appropriate results.
This opens the Snipping Tool application and its window looks similar to the screenshot below.

As you can see, the application looks almost identical to the Windows 7 version. Its features are the same in both operating systems. Only a few minor settings (e.g. the default ink color) are different than in Windows 7.
That’s why the remainder of this tutorial will be done using the version existing in Windows 7.

Snipping Tool’s Main Interface

The Snipping Tool window has three important buttons: New, Cancel and Options.
The New button allows you to select the type of screenshot that you want to take and take a screenshot. The Cancel button enables you to cancel the current action. The Options button allows you to customize different aspects of the application.

How to Take a Custom Screenshot

There are four types of captures found under the New button:
  • The Free-form Snip enables you to draw an irregular line around an object or area.
  • The Rectangular Snip allows you to take a screenshot shaped as a rectangle, by dragging the cursor around an object.
  • Window Snip allows you to select a window (e.g. your Internet browser) or dialogue box (e.g. error message received from an application) and capture it.
  • Full-screen Snip enables you to capture the entire screen, like the old-fashioned Print Screen key.

To share an example, let’s see how to capture a part of your Desktop using Free-form Snip. First of all select the Free-form Snip from the drop down menu and then choose the area that you want to cut.

Select the area that interests you by clicking and dragging your cursor. As you drag, the selected area is surrounded by a red border, if you are using the default settings.

When you release the mouse button, the captured area is automatically copied to the mark-up window, where you can annotate, save or share the screenshot.

How to Edit a Screenshot

This editing window offers useful tools for editing the capture you took. For example, if you are not satisfied with the quality of the picture you can always make a new one using New Snip button. Before saving your screenshot, you can use the ’Pen and Highlighter’ tools from the toolbar and add markup to the capture. The Eraser tool will remove marks made with the ’Pen and Highlighter’.

To save the screenshot, press the Save Snip button, select the location, complete the file’s name and choose the file type: PNG, GIF JPEG or HTML. The, press Save.

NOTE: If you want to find out more about file types, I recommend file-extensions.org.
You may email a screenshot without saving it to your computer, by using the ’Send Snip’ button on the toolbar. It gives you two options: E-mail Recipient and E-mail Recipient (as attachment).
NOTE: For using this option you need to have an account configured in your default email program. In case you don’t have an email address configured, I suggest saving the screenshot as an image and then sending it using your web-based email account (e.g. Hotmail, Yahoo! Mail, Gmail, etc).

How to Customize the Snipping Tool

When you start the Snipping Tool, you can click on the Options button to set your preferences on how the program should work.

Options is found also in the Tools menu.

The options are broken up into Application and Selections groups.
The Application section has a set of checkboxes that enable you to make the following changes:
  • ’Hide Instruction Text’ - hide the instruction text in the main Snipping Tool window.
  • ’Always copy snips to the Clipboard’ - copy all captures to the Windows clipboard so you can paste them into other applications (e.g. Word processors or image editors).
  • ’Include URL below snips (HTML only)’ - save your snips as a Single File HTML or MHT documents. If a snip is taken from an Internet Explorer window, it also shows the URL of the webpage included in the screenshot.
  • ’Prompt to save snips before exiting’ - gives you a heads up if you have any captures that you have not saved, prior to closing the program.
  • ’Show screen overlay’ - if disabled, when you are taking a screenshot, the Snipping Tool transparent overlay disappears from the screen.

The second section, named Selection Options, allows you to make a few settings regarding the color palette :
  • ’Ink Color’ - changes the color of the selection border when you create a snip.
  • ’Show selection ink after snips are captured’ - when enabled, the selection border will be shown, using the color selected in the ’Ink Color’ option, around the snip.

Conclusion

Now that you know how to use the Snipping Tool, the coast is clear for you to take great looking captures.


References: http://www.7tutorials.com/how-use-snipping-tool


Related Posts Plugin for WordPress, Blogger...