Some people sent us messages asking how they can remove the test versions of Windows 8 they installed or even older versions of Windows, such as Windows Vista or Windows 7. It doesn’t matter what versions of Windows you have, the procedure for uninstalling one of them is the same and I will share it in this article. Two scenarios are covered: how to remove one version of Windows when you have multiple installations of Windows on your computer and how to remove Windows when it is the only operating system installed.
How to Remove a Version of Windows in a Dual or Multi Boot Scenario
Let’s assume you installed a test version of Windows 8, like Windows 8 Release Preview in a dual-boot setup with Windows 7. Now you want to remove the test version of Windows 8 and install the final version of Windows 8 or simply use the space occupied by it for something else. How is this done?
Step 1. Backup Your Data
First, make sure you backup any important data you have on the partition where you installed the Windows version you want to remove. You will lose it if you don’t do it now, while that operating system exists and works well.
Step 2. Remove the Boot Entry for the Windows You Want Removed
Now it is time to remove the boot entry for the operating system you want to remove (in my example - Windows 8 Release Preview). Do this from the version of Windows you want to keep - in my case Windows 7.
Boot to the operating system you want to keep and launch the System Configuration tool in Windows or any other manager for boot entries that is compatible with all the operating systems you have installed.
If the version of Windows you are about to remove was set as the default boot operating system, change the default to the operating system you want to keep. This is done by selecting the Windows you want to keep and pressing "Set as default".
Select the Windows version you want removed, press Delete and then OK.
To test if everything is OK with the version of Windows you want to keep, restart the computer and see if you can boot it without problems. You should be able to. In case you can’t, you can repair its boot entry using the installation disc. We have a great article sharing the system recovery tools you can use: An Overview of System Recovery Options for Windows 7.
Step 3. Format The Partition Used by the Windows You Want Removed
Next, you should format the partition where you installed the Windows version you want removed. This, if you plan to reuse that partition to install another operating system.
If you would rather use that space to extend other partitions, right click on it and select Delete Volume to delete that partition. Then, the available empty space can be added to other partitions. For this job, you can use the Disk Management tool in Windows. We have a complete guide on how to use it, here: How to Manage Your Disks using the Disk Management Utility.
I will assume you want to reuse the same partition for another operating system. For example, you remove Windows 8 Release Preview so that you can install the final version of Windows 8.
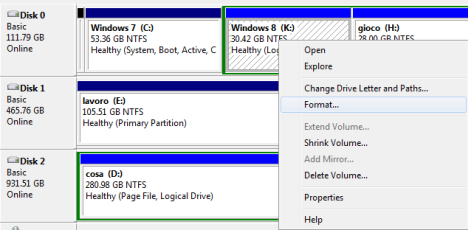
Open the Disk Management tool and select the partition that you will format.
Right click and select Format.
You can change the label and the file system if you want to. If not, leave the default values and click OK.
You are warned that you are about to erase all the data existing on that partition. If you backed up everything that was important to you, press OK.
You might be warned that the selected partition is in use. To force the format, press Yes and the format is done in a few seconds.
The version of Windows you wanted to uninstall is now removed.
NOTE: You can use any partition management tool to do this. I showcased the Disk Management tool just because you can find it in Windows and use it right away.
What If You Have Non-Microsoft Operating Systems Installed?
If you have a multi-boot setup that includes non-Microsoft operating systems, like Ubuntu Linux, the steps are the same. The only difference is that you need to use a different tool to remove the boot entry for the version of Windows you want removed, so that the entries for the non-Microsoft operating systems are not negatively impacted.
A tool that works well is EasyBCD 2.2. You can use also other tools you know of. Unfortunately I’m not an expert in using and configuring Linux or other non-Microsoft operating systems.
How to Remove Windows When Only One Version is Installed
If you installed just one Windows operating system, then the uninstallation is really simple. Take the installation disc of the operating system you want to use next, boot from it and, during the installation procedure, select the existing Windows partition and format it or delete it. Then, reuse that partition (or available empty space) as you see fit and install the new operating system.
Before you do this, make sure to backup all your important data.
Conclusion
As you can see from this guide, uninstalling Windows is easier than it seems. Anyone can do it if they pay attention to the steps detailed above.
References: http://www.7tutorials.com/how-uninstall-windows-8-windows-7-or-any-other-version-windows
References: http://www.7tutorials.com/how-uninstall-windows-8-windows-7-or-any-other-version-windows


No comments:
Post a Comment