Page List

06 November 2012

How Easy Is It To Crack A Wifi Network?


Whether you’re a computer novice or a pro-level geek, you probably have some idea about Wifi security. You know that you need to have some kind of password – preferably a long password, maybe even with some punctuation; and you also know that there’s a setting on your router to hide the network name so other people can’t see it. You’ve done all that, and now your sitting there safe and sound in the knowledge that your network is on lockdown. Really? You might want to keep reading, as we dispel a few common beliefs about Wifi security.

Hiding your Network SSID

Security through obfuscation is the worst kind; anyone with access to the most basic of wifi hacking tools will see your “hidden” network listed alongside everyone else’s. The only people it is genuinely hidden from are legitimate users; family, friends, or customers trying to connect to an invisible network that they can’t see when they click on the little wifi icon in the corner. The hacker meanwhile, has identified your hidden network and is launching the next app he’ll use to crack your passkey. The clock is ticking.

Advice: Don’t bother hiding your SSID – the only person it’ll cause problems for is yourself.

WEP Passwords

WEP passwords are the old way of securing a network; I showed you a long time ago how they are incredibly easy to crack by simply sniffing out network traffic that’s broadcast around. You can even buy special routers from China that automatically crack any local WEP-secured networks, then re-broadcast the signal as a properly secured Wifi for your own purposes.

Sadly, a lot of older devices are incompatible with WPA. Some game cartridges for the latest Nintendo 3DS won’t work with WPA, even though the console itself is compatible. I know my old iPhone had issues with WPA sometimes, too.
Advice: Never drop down your wifi security to the level of WEP password only – you are asking to have your internet used for all manner of nefarious purposes. If you have a device that’s incompatible, throw it in the trash and buy a real game console or new phone instead. There is absolutely no excuse for using WEP security in this day and age. If you’re out and about, don’t ever connect to one of these either; people can very easily listen in to your web traffic, resulting in stolen passwords, redirected bank logins and all things nasty.

WPA Security

I’m not at risk - you’re thinking - I have a 25 character long password and I use WPA2-PSK – the best security available. Well yes, that may be true; but you’re still not safe. Most routers contain something called WPS technology. WPS was an attempt to simplify connecting devices to the network; you could either use a simple, one-touch button on devices like games consoles and Wifi printers, or you type in an 8-digit number that’s printed on the side of your Wifi router. That 8-digit (numerical) password completely bypasses the need for a lengthy alphanumeric password. But don’t worry, manufacturers realised how silly this sounds and built-in safeguards to prevent brute force hacking of this number – after 3 failed attempts, there is a 60 second cooldown time. To randomly attack an 8-digit password would therefore take 6.3 years; you’d probably notice if someone was parked outside for that long. So we’re cool, right?
No. You see, they made a very slight oversight – they split the passkey number in 2 sets of 4 digits. After guessing the first 4, the router sends a helpful “you got the first half correct” notification, so you can save those for reference. You only need to break 4 numbers, twice. That limits your list of possible combinations to just 10,000 for each set. The 6.3 years required is now cut to less than a day. But it gets worse, as some manufacturers don’t even bother to implement a cool-down period between failed attempts. Yes, this is a momumental failure; with the correct tool (here’s my helpful tutorial), even your WPA2 protected network can be hacked in just a few hours.

Since WPS technology has been a requirement of certification for all wifi routers and enabled by default, it’s almost certain your router is susceptible. What can you do to protect yourself?
  • Disable WPS completely – this will vary by router. Be sure to test again after – although my router had this option, there was another internal WPS PIN that was separate from the user displayed one on the side of the router, and disabling just the user one offered no protection at all – the internal PIN could not be deactivated, yet could still be cracked.
  • Disable Wifi; this is probably the best option if you’re using something provided by your cable company or ISP; if you absolutely need Wifi, buy another router and put your ISP supplied one into “modem mode”.
  • Update the firmware of your router; assuing there is an update available.
  • Replace the firmware completely, with Tomato or DD-WRT.

In summary, the chances of your Wifi connection being 100% secure are exceedingly low, regardless of how long your password is, whether or not you obscure the network name – it’s all crackable, and I’ve demonstrated it. If you want to be truly safe, you need to disable any wireless functionality completely, or make absolutely sure that WPS functionality is disabled fully on your router. You can and should run the tools linked above against your own networks to see if you’re vulnerable. So – do you still think you’re secure?


References: http://www.makeuseof.com/tag/how-easy-is-it-to-crack-a-wifi-network-makeuseof-explains/


05 November 2012

Solution to Google Chrome Blocking Installation of Extensions Out of Web Store


Recently, the Dev, Canary and Beta channels of Google Chrome started blocking installation of extensions originating from outside the official repository, that is, the Chrome Web Store. Attempting to install extensions from third party website produces a notification message that says “Extensions, apps and user scripts can only be added from the Chrome Web Store”. As noted in the message, Chrome also disallows installation of user scripts, which are almost always third-party. This is not a good thing for users wanting to install Greasemonkey scripts or Stylish scripts or any other type of scripts.


Installation of off-store extensions were always blocked in Chrome to protect users from malicious scripts and extensions. But previously, users could click on a link to a *.crx file, and Chrome would offer to install the file after a few warnings. Starting in Chrome 21, it has become more difficult to install extensions, apps, and user scripts from outside the Chrome Web Store. By default, all extensions outside the Chrome Web Store are blocked and can only be installed by dragging the downloaded .crx file onto the Chrome Extensions page.
In order to install off-store extensions, the user must download them to a directory and drag them onto the chrome://extensions/ page, which is the same page that opens when you click Extensions under the Tools menu.


Once you drop a downloaded extension (.crx file) to the Extensions page, the installation will begin as usual.
GHacks shares another way to force Chrome into accepting extensions and scripts from third party websites. This can be done by launching Chrome with the parameter --enable-easy-off-store-extension-install.
To add the startup parameter, right-click on the Chrome shortcut in your desktop and click on Properties. In the target filed, append the path with the above parameter. Notice the space before the two dashes.


When you start Chrome using this shortcut, you should be able to install extensions and userscripts from third party sites as before. 


References: 
http://www.instantfundas.com/2012/07/solution-to-chrome-blocking.html
http://googlesystem.blogspot.com/2012/07/chrome-extensions-not-in-chrome-web.html
http://support.google.com/chrome_webstore/bin/answer.py?hl=en&answer=2664769


03 November 2012

How to Uninstall Windows 8, Windows 7 or Any Other Version of Windows


Some people sent us messages asking how they can remove the test versions of Windows 8 they installed or even older versions of Windows, such as Windows Vista or Windows 7. It doesn’t matter what versions of Windows you have, the procedure for uninstalling one of them is the same and I will share it in this article. Two scenarios are covered: how to remove one version of Windows when you have multiple installations of Windows on your computer and how to remove Windows when it is the only operating system installed.

How to Remove a Version of Windows in a Dual or Multi Boot Scenario

Let’s assume you installed a test version of Windows 8, like Windows 8 Release Preview in a dual-boot setup with Windows 7. Now you want to remove the test version of Windows 8 and install the final version of Windows 8 or simply use the space occupied by it for something else. How is this done?

Step 1. Backup Your Data

First, make sure you backup any important data you have on the partition where you installed the Windows version you want to remove. You will lose it if you don’t do it now, while that operating system exists and works well.

Step 2. Remove the Boot Entry for the Windows You Want Removed

Now it is time to remove the boot entry for the operating system you want to remove (in my example - Windows 8 Release Preview). Do this from the version of Windows you want to keep - in my case Windows 7.
Boot to the operating system you want to keep and launch the System Configuration tool in Windows or any other manager for boot entries that is compatible with all the operating systems you have installed.

If the version of Windows you are about to remove was set as the default boot operating system, change the default to the operating system you want to keep. This is done by selecting the Windows you want to keep and pressing "Set as default".
Select the Windows version you want removed, press Delete and then OK.
To test if everything is OK with the version of Windows you want to keep, restart the computer and see if you can boot it without problems. You should be able to. In case you can’t, you can repair its boot entry using the installation disc. We have a great article sharing the system recovery tools you can use: An Overview of System Recovery Options for Windows 7.

Step 3. Format The Partition Used by the Windows You Want Removed

Next, you should format the partition where you installed the Windows version you want removed. This, if you plan to reuse that partition to install another operating system.
If you would rather use that space to extend other partitions, right click on it and select Delete Volume to delete that partition. Then, the available empty space can be added to other partitions. For this job, you can use the Disk Management tool in Windows. We have a complete guide on how to use it, here: How to Manage Your Disks using the Disk Management Utility.
I will assume you want to reuse the same partition for another operating system. For example, you remove Windows 8 Release Preview so that you can install the final version of Windows 8.
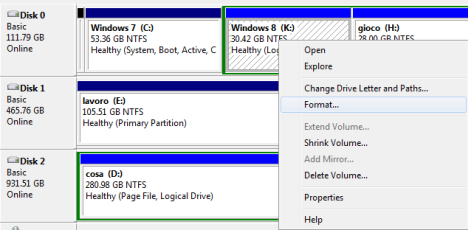
Open the Disk Management tool and select the partition that you will format.

Right click and select Format.

You can change the label and the file system if you want to. If not, leave the default values and click OK.

You are warned that you are about to erase all the data existing on that partition. If you backed up everything that was important to you, press OK.

You might be warned that the selected partition is in use. To force the format, press Yes and the format is done in a few seconds.

The version of Windows you wanted to uninstall is now removed.
NOTE: You can use any partition management tool to do this. I showcased the Disk Management tool just because you can find it in Windows and use it right away.

What If You Have Non-Microsoft Operating Systems Installed?

If you have a multi-boot setup that includes non-Microsoft operating systems, like Ubuntu Linux, the steps are the same. The only difference is that you need to use a different tool to remove the boot entry for the version of Windows you want removed, so that the entries for the non-Microsoft operating systems are not negatively impacted.
A tool that works well is EasyBCD 2.2. You can use also other tools you know of. Unfortunately I’m not an expert in using and configuring Linux or other non-Microsoft operating systems.

How to Remove Windows When Only One Version is Installed

If you installed just one Windows operating system, then the uninstallation is really simple. Take the installation disc of the operating system you want to use next, boot from it and, during the installation procedure, select the existing Windows partition and format it or delete it. Then, reuse that partition (or available empty space) as you see fit and install the new operating system.
Before you do this, make sure to backup all your important data.

Conclusion

As you can see from this guide, uninstalling Windows is easier than it seems. Anyone can do it if they pay attention to the steps detailed above.


References: http://www.7tutorials.com/how-uninstall-windows-8-windows-7-or-any-other-version-windows


02 November 2012

How to Dual Boot Windows 8 with Windows 7, Windows Vista or Windows XP


On the Internet you may find plenty of guides on how to install Windows 8 on your computer but very few guides on how to create a dual boot setup and have it run alongside Windows 7, Windows Vista or Windows XP. That’s why we decided to help users who want to create a multiboot setup and share the steps required to install Windows 8 alongside earlier versions of Windows. Don’t hesitate to read the whole article and save yourself from problems and issues.

Step 1. Learn About The New Windows 8 Boot Manager

First, you need to learn about the new boot manager included with Windows 8. It is one of the most important novelties in Windows 8. The new boot manager not only looks different but:
  • It is touch friendly and can be used easily on tablets and displays with touch;
  • It allows you to choose the default operating system to boot into after a set time;
  • It provides more tools and features than the boot managers of earlier versions of Windows;
  • It takes longer to load than other boot managers but facilitates a faster boot procedure for Windows 8. As you will experience yourself, Windows 8 has the fastest boot time of all versions of Windows;
  • If you choose to boot into Windows 7 or another previous version of Windows, it will reboot your system and load the boot manager appropriate for that version of Windows.

Since it is so different it is incompatible with the boot managers from earlier versions of Windows.

Step 2. Install Other Versions of Windows First - Leave Windows 8 Last

Since the Windows 8 boot manager is so different, in a multi-boot configuration, Windows 8 should always be installed last. If you install it first and then other versions of Windows, the new boot manager will be overwritten and you won’t be able to boot into Windows 8. Then, you need to repair the boot manager with the Windows 8 installation disc or use some third-party software to manage and fix your boot entries.
You can try EasyBCD 2.2 Beta which provides support for Windows 8. If you find other boot managers that work with Windows 8, don’t hesitate to share them in the comments.

Step 3. Create a Partition Just for Windows 8

Once you are done installing other versions of Windows, you should partition your hard drive and create a new partition just for Windows 8. Make sure that this partition is at least 20 - 25 GB in size. If you plan to install lots of applications in Windows 8, don’t hesitate to make the partition bigger.

There are many tools you can use to create this partition. If you prefer the tools included in Windows, then don’t hesitate to use the Disk Management tool. To learn how to use it, read this tutorial: How to Manage Your Disks using the Disk Management Utility.

Step 4. Install Windows 8

Only after you install the other versions of Windows and create the partition for Windows 8, go ahead and install Windows 8.
Get the installation disc, boot from it and start the Windows 8 setup. Follow our detailed installation guide: How to Install Windows 8 RTM on Your Computer.

For a multiboot setup, the steps are the same as in that guide. The only difference is that when you are asked to select where to install Windows 8, select the partition that you created and make sure you don’t select the partitions where other operating systems are installed.

Step 5: Customize the Default Boot Operating System

After you install Windows 8, it is set as your default boot operating system. If you plan to use it as your main operating system, that’s OK.
However, if you plan to use it as a secondary operating system, it is best to change the default. You can use the System Configuration utility in Windows to change the default boot operating system.

You can also use a third party tool like EasyBCD 2.2 Beta or the Windows 8 boot manager.

Conclusion

As you can see from this guide, installing Windows 8 alongside Windows 7, Windows Vista or Windows XP can be done with relative ease. However, you do need quite a bit of time to get everything done and you need to pay attention to the order in which operating systems are installed.


References: http://www.7tutorials.com/how-dual-boot-windows-8-windows-7-windows-vista-or-windows-xp


01 November 2012

Connect to a Windows Desktop from Ubuntu via Remote Desktop Connection


A useful feature of Windows is being able to connect to your desktop from another location to remotely manage your computer. While this functionality is native in Windows 7 and previous versions, it is not supported by default in many Linux distributions, including Ubuntu. However, using any of the tools available, you can connect to a Windows remote desktop with ease. This tutorial will show how.
NOTE: This tutorial works on Ubuntu 10.10 & 11.04.

Step 1: Enable Remote Connections for Windows 7

In order to allow other computers to connect remotely to your Windows 7 computer, you need to enable the Remote Desktop functionality. To learn how to do this, check out this tutorial: Enabling Remote Desktop Connections in Windows 7.

Step 2: Install a Remote Desktop Client - Our Choice: Remmina Remote Desktop Client

By default, Ubuntu doesn’t come with a remote desktop client which supports the Remote Desktop Protocol (RDP) used by Windows operating systems for remote connections. You need to install one of the clients available in the Software Center.
First, start the Ubuntu Software Center, by going to Applications -> Ubuntu Software Center. In the Get Software section, search for ’remote desktop’. You will see a list with many alternatives. For this tutorial, we preferred to choose Remmina Remote Desktop Client, a client which is very appreciated by the user community and is, at the same time, very versatile and easy to use.
To get it installed, select it and click Install.

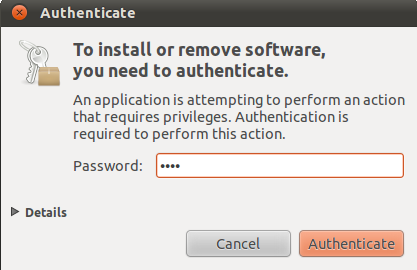
You are asked for your password. Type it and click Authenticate.

NOTE: please keep in mind that, in order to install software, your user account needs to have administrative permissions. If you are set as a Desktop user, you cannot install any software.
Now the application is downloaded and installed. Wait until the procedure ends.

Step 3: Configure the Remote Desktop Session

Now it is time to start the Remmina Remote Desktop Client by going to Applications -> Internet.

Click on the New Connection button.

This opens the Remote Desktop Preference window, where you can configure the remote connection.
In the Profile section, type the name you want to use for the connection. It can be anything you wish.
Then, in the Basic tab, complete the IP address of the Windows computer in the Server field. Then, type the username and password you want to use to connect to the Windows computer. Be aware that the user needs to be defined on the Windows computer.
You can also set the Resolution you want to use for the connection and the Color depth.

NOTE: Selecting a larger desktop size and color depth can impact the performance of your remote desktop session. If you experience lag when connected to a remote desktop, try reducing the color depth or resolution.
If you want to share a folder existing on your Ubuntu computer with the Windows computer, simply check the Share folder box and select the folder you want to share from Ubuntu.
Also, for more advanced settings, go to the Advanced tab. There you can turn the sound on or off, share printers, disable clipboard synchronisation, etc.

Once you are done making all the settings, click on the Connect button. After a while, if the Windows computer is turned on, you should be connected to it.

Once you close the remote connection, Remmina Remote Desktop Client automatically saves it so that you will be able to reconnect at a later time, with a simple click on the connection name.

Conclusion

As you can see, the procedure is not really complicated. As long as you make the right settings and use a client which supports the RDP protocol, connecting remotely from Ubuntu to a Windows desktop is almost a trivial task.


References: http://www.7tutorials.com/connecting-windows-remote-desktop-ubuntu


Related Posts Plugin for WordPress, Blogger...