Page List

17 June 2012

How To Flash A Custom ROM To Your Android Phone With ROM Manager + Full Backup & Restore

Have you been hearing about all this custom ROM business - Cyanogen, DamageControl, etc and wondering what in the world all those are about?
Or perhaps you already know what those are but are still afraid of trying custom ROMs on your phone because you don't know how to install them or don't want to lose your data and current OS state?
Well, today is your lucky day because in this article from the "I wish somebody showed me how to do this crap when I was getting started" series, I will show you how to
  • easily install a custom ROM but only after you
  • back up your current system and exact phone state so that you can
  • restore to that exact state with a click of a button
What do you have to lose now? Try out a new ROM and go back to your original OS in a matter of 30 minutes.
Sounds like a good deal? Then let's go.
Note: By the way, having written this tutorial, I know it may seem like there is a lot to do here, scaring you away, but in reality there really isn't - I was simply trying to provide as much detail and be as clear as possible, covering all the bases.
I am using an Sprint HTC Hero (CDMA) in this tutorial and in fact this is exactlyhow I got Android 2.1 on it using the DamageControl ROM, weeks before it was released by Sprint (in fact, it's not even released yet at the time of this writing).
The specific phone used is not important and I listed it just for reference - ROM Manager should work with pretty much every Android phone. 

Custom ROMs

At first I started an explanation of custom ROMs here, but it quickly outgrew itself and demanded to be in a separate post. Who am I to argue with the creative genius?
Proceed to read the Custom ROMs For Android Explained And Why You Want Them article and then come back here - I'll be waiting.
By the way, if you are wondering, you will most likely have to wipe when upgrading to a custom ROM (of course, we'll do a full backup first) but once you've installed it, any regular updates are usually applied right over the current version and don't require any wipes.
Remember, all your Google contacts sit in the cloud and will be sync'ed right back as soon as you boot the new ROM and log into Google. 

The Steps

Here are the steps, at a glance. Look the list over and move on to the more detailed explanation of each bullet point.
  1. Root Your Phone
  2. Install ROM Manager App
  3. Back Up
  4. Download The ROM You Want To Try
  5. Flash It
  6. Want To Go Back? Restore It 

1. Root Your Phone

The first thing you need to do is root your phone. Don't be afraid - we already covered this in the Rooting Explained + Top 5 Benefits Of Rooting Your Phone article a few weeks ago, so go ahead and read that first - I'll wait.
Rooting is usually a 5 minute process, and many guides around the web explain what that process is for your exact phone model and Android version combinations, just Google "YOUR_PHONE_MODEL root".
Now that you have root, let's proceed to the next step.  

2. Install ROM Manager App

This is the easiest step. Go to the Android Market on your phone and install ROM Manager.
This excellent application handles backing up and restoring, as well as flashing new ROMs, all from an easy user interface. This application requires root, which is why we've first gone with step 1.
Got the app installed? You should see something like this: 
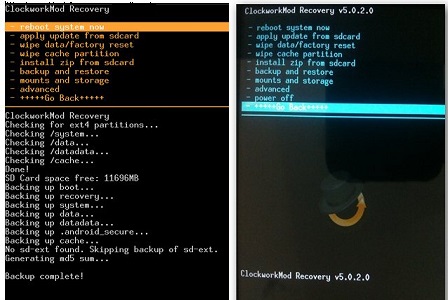

3. Back Up

This part is very easy and in fact I dedicated a whole tutorial just to this subject which you can read if you want more details about the backing up and restoring process.
Done reading the backup tutorial? Now check this out: you don't even have to perform a manual backup - ROM Manager will automatically ask if you want to back up or not in step 5, when you are flashing the new ROM. This is what it will look like: 


3.1. Flash A Recovery Image

If you read the backup/restore article above, you may have seen that there is a one-time step that was needed before ROM Manager, or any other manager, can install ROMs, back up, restore, or do anything with Nandroid Backup - and that is flashing a recovery image.
Important: unplug the USB cable during this step, as some users are reporting problems flashing recovery while plugged in (thanks DennGir and others).
This recovery image contains a boot loader which replaces your original boot loader.
The boot loader gives you the ability to run Nandroid backup and restore commands outside of the OS.
It also lets you install ROMs but we will not do that today. Since the OS cannot back itself up fully while running, ROM Manager will reboot into this boot loader to perform Nandroid operations.

Again, remember: this step needs to be done one time only

4. Download The ROM You Want To Try And Copy It To Your Phone's SD Card

Here is where you need to do a bit of research and find the ROM image you want to put on your phone. If you don't know exactly what you're looking for, again, Google can help you - just search for "YOUR_PHONE_MODEL ROM" and look around.
For instance, if you have a Nexus One, you may want to go with CyanogenMod and if you have a Sprint HTC Hero (CDMA), you will want to check out DamageControl.
If you bought ROM Manager Premium, which I recommend, you would have a "Download ROM" menu enabled right within the app, containing some of the most popular ROMs, so you don't have to look for them online or spend time downloading them on your computer and copying to the phone.
If you choose not to use ROM Manager Premium or if the ROM you want is not included in the default list, then keep reading this section.
Each ROM you find will be based on a specific Android version - make sure to pay attention to that. 

DamageControl ROM For The HTC Hero

In my case, I knew that there were not many options for my Sprint HTC Hero and I quickly found that the DamageControl ROM was exactly what I'd been looking for.
It is currently based off Android 2.1 and it's exactly what I had flashed on my phone to come up with this [p]review: Detailed Mega Review Of Android 2.1 On Our HTC Hero – Discover All The New Features (With Lots Of Screenshots)

Download The ROM You Selected

Download the ROM image, which is usually a zip archive, and copy it into the root folder of your SD card.
Important: you do not unzip the .zip file - just copy it as is.
You can do it by
  • attaching the phone with a USB cable and selecting the option of mounting the SD card to be used as a drive on the computer
or
  • unmounting the SD card, physically taking it out of the phone, and inserting into your own card reader
or
  • downloading the ROM straight from the phone browser
Once you've copied the ROM image, you can proceed to flashing it in step 5.
If you purchased ROM Manager Premium for $3.99, in addition to thanking the developer for the awesome job, you've also unlocked a few premium features.
In particular, the Premium version can download ROMs compatible with your phone straight from ROM Manager. Just select "Download ROM" and see which ones are available for your model.
Unfortunately, there is no ROM entered into the app for Sprint HTC Hero at the moment, so you still have to download it manually using the directions in step 4. 

5. Flash It

The process of installing new firmware or low-level system software in general is called flashing.
We will be flashing the new custom ROM over the stock one that came with your phone.
  • Pop open the ROM Manager and click "Install ROM from SD Card"
  • The ROM you downloaded in step 4 should show up in the list. If it doesn't, make sure you've put it into the root folder of the SD card.
  • Click on the ROM and you should receive a popup inviting you to
    • back up existing ROM (which you should do unless you've already backed up manually) and
    • wipe data and cache, which you should only do if you want to do a clean install, i.e. when upgrading from the stock ROM. Note: this does not wipe your SD card data - it only wipes the phone's internal memory.
  • Follow the rest of the prompts and voila - the ROM is being installed!
Check out these screenshots I took, showing the full process: 

The flashing process should take 5-10 minutes installing everything and then 10-20 minutes during the first boot. Please be patient during this process.
Once the phone boots, you should find yourself in the new ROM.
This is it - end of the road! You've done it! Enjoy your fast and clean phone. 

Problem During Flashing?

If after the "Reboot and Install" step, you immediately get a picture of Android with a big exclamation point, most likely it means the ROM image you downloaded was not cryptographically signed by the developer (which happens if they were in a hurry to release or simply don't use encryption).
That's OK - you can fix this by:
  • clicking the exclamation point screen, which goes to the ClockworkMod recovery menu or simply rebooting into recovery manually (that's one of the options in the ROM Manager). Alternatively, you can boot into recovery by holding Power and Home buttons together while powering up your phone
  • selecting the option that says "install zip from sdcard"
  • toggling the "toggle signature verification" option to turn the verification off (it should say "Signature Check: Disabled")
  • giving flashing another try by selecting "choose zip from sdcard" and selecting the right ROM, just like before
I took some screenshots of this process to make this easier to comprehend: 


6. Want To Go Back? Restore It

Alright, you may want to restore the original full backup of your OS that you took in step 3 (or 5). Maybe you forgot something in the original installation or want to go back to stock for another reason - no problem.
Install and load up the ROM Manager app in the custom ROM you flashed (basically, repeating step 2). Now use the "Manage and Restore Backups" menu to find your backup and restore it (including the OS itself and all the apps, settings - everything that you backed up).
After you're done restoring, you'll be back to your original OS as if nothing ever happened (was it just a dream?)
You can read more about the Backup/Restore procedure in our tutorial called [Complete Guide] How To Fully Back Up And Restore Your Android Phone Using Nandroid Backup


16 June 2012

How to Install Custom ROM on Android Smartphone


If you’re among those whose Android Smartphone is left in the cold and stuck to an old android build, the best way is to install a custom ROM which would be nearly a complete latest upgrade. Void your warranty, root it out and give your phone a new smart life.  There are plenty of Custom ROMs available which will work flawlessly and even provide more functions as compared to official ROMs. Installing a custom ROM is dead easy, thus you can test various available ROMs from different vendors and choose the one which suits you most. The popular ROMs are CyanogenModMIUIDarkyROM, etc.  

Things you should know before beginning

  • Before beginning, your phone must be rooted. This is compulsory as you can’t install a custom ROM unless you’re rooted. Since every phone has a unique procedure of rooting, so to know the right way for your phone, made a simple Google search like-“How to root your phone name”.
  • Be sure that you have enough free space on your phone internal memory.
  • You must have sufficient battery before proceeding towards installation of Custom Firmware.
  • Download the appropriate Custom Firmware which you wish to install and put it in your SD card . 

Installing Clockwork Mod Recovery


Another compulsory thing you need to install before beginning is Clockwork Mod Recovery. To install Clockwork Mod recovery, download the ROM manager from Android market [Link].
After installing the Rom Manger from market, Launch ROM Manager and tap on Flash Clockwork Mod Recovery.After few seconds Rom Manager will ask you to confirm your model. Proceed by choosing the right phone model.
Your phone will reboot after downloading and flashing the Clockwork Mod recovery. Now to boot in recovery, again launch the Rom Manager and tap reboot into recovery. The phone will restart automatically and boots in Clockwork Mod.

Beginning the installation procedure

  • Step 1: Download the appropriate Custom Firmware which you wish to install and put it in your SD card.
  • Step2: Now to boot in recovery, launch the Rom Manager and tap reboot into recovery. The phone will restart automatically and boots in Clockwork Mod.

  • Step 3: Once you’re logged into Clockwork recovery, use the volume up/down buttons to scroll through the menu ,use the home button for confirming the operation and back keys to move a step backward.
  • Step 4: It will be good if you make a backup of your existing firmware. Navigate to backup and storage > backup and after conforming, a nandroid backup of your device will be created in SD card.
  • Step 5: Once backup is complete, go back and navigate to wipe data / factory reset. Confirm this wipe operation.
  • Step6: Similarly wipe cache and dalvik partition.
  • Step 7: Now this very step will install your custom firmware. From the main menu proceed to install zip from sdcard > choose zip from sdcard > [name of file you downloaded in step 1]. Confirm the operation by choosing yes. Wait until it says –“Installation Complete”.
  • Step 8: Once flashing is complete, reboot your device and start exploring the upgrade. 


15 June 2012

如果婚姻是爱情的坟墓


如果婚姻是爱情的坟墓,那...

渴望爱情 → 不知死活
物色对象 → 活得不耐烦了
相亲 → 为自己的墓地看风水
爱慕 → 大限之期不远矣
表白 → 自掘坟墓
拒绝 → 死里逃生
谈恋爱 → 这不是玩命是什么
写情书 → 为自己的墓地分期付款
冷战 → 苟延残喘
分手 → 千钧一发
破镜重圆 → 该来的还是要来
求婚 → 教唆自杀
储蓄结婚基金 → 投保寿险
订婚 → 一只脚已经踏进了棺材
结婚 →双双殉情
第三者 → 盗墓
移情别恋 → 迁墓
离婚 → 置之死地而后生
订婚宴客 → 追悼会
结婚宴客 → 超渡法会
亲朋好友 → 奔丧大队
包红包 → 慰问金
公证结婚 → 由法院出具死亡证明
集体结婚 → 集体自杀
结婚热潮 → 争先恐后赶着去死
理想的结婚对象 → 人间净土
结婚多次的人 → 示范公墓
婚友社 → 葬仪社
婚姻专家 → 公墓管理员
结婚纪念日 → 清明扫墓节
一般状况结婚 → 寿终正寝
闪电结婚 → 猝死
先上车后补票 → 爽死
奉子之命结婚 → 怎么死的都不知道
对婚姻犹豫不决 → 生死一瞬间
假结婚 → 装死
异国之恋 → 客死他乡
女人总是引诱男人走向爱情的坟墓 → 最毒妇人心
男人总是带着女人奔向爱情的坟墓 → 无毒不丈夫

如果婚姻是爱情的坟墓,一年一次的结婚周年庆祝,便是在「扫墓」了。
如果婚姻是爱情的坟墓,那模范夫妻充其量,不过是「示范公墓」罢了。

「别让你的权利睡着了」,这句话常用于洞房花烛夜。

人的喜新最久只有三十天,所以新婚燕尔只有蜜「月」;
人的忍耐最久只有三十天,所以工作以「月」薪为准。

「娘家」:女人小时候的观护所,长大后的监理所,结婚后的避难所。

结婚不是什么「人生」大事,只是合法「生人」的一道手续而已。

完全相反的个性,结婚时叫「互补」;离婚时叫「个性不合」。

避孕的效果:不成功,便成「人」。

女人的「折旧率」煞是惊人,从「新」娘变成「老」婆,只消一个晚上的光景。

相亲是「经销」,恋爱叫「直销」,而抛绣球招亲则为「招标」。

婚姻是牢笼,所以有些男女在婚后莫不是「喜出」、「望外」。

在爱情中,有人「视死如归」;在婚姻中,有人「视归如死」。

恋爱时的花费,证明爱情「真实」;结婚后的开支,证明婚姻「无价」。

「敬人者人恒敬之」,在世风日下的今天,唯有在酒席间,才能见到这项美德。

在马路上,开车无难事,只怕有「新人」!

当一个人常自称「不是省油的灯」,这就表示他需要「多加油」。

想做武器的目地是因「唯恐天下大乱」;做了武器之后,却「唯恐天下不乱」。

对男人来说,「干妹妹」就是—进可攻,退可守,「送礼」「自用」两相宜。

只有在大排长龙时,才能真正体会到我们是「龙的传人」。

「特种行业」就是特别带种的人才会去的地方。

男人的脸是他的人生履历表,女人的脸是她的人生损益表。

「官」若好,社会是彩色的;「官」若不好,社会是黑白的。

官场打滚心得——「路遥知马屁,日久见人腥」。


References:
http://xiaohua.zol.com.cn/detail19/18025.html
http://news.xinhuanet.com/comments/2003-04/11/content_827730.htm
http://www.kanqq.com/qqqm/22371.htm


13 June 2012

甘地,金,池田和平展 隆重揭幕


(金宝13日讯“甘地,金,池田和平建设的传承”展览在拉曼大学文遗堂揭开了序幕。当天由拉曼大学副校长郑志成博士致词,他希望学生们能在大学生涯里面不只学习到正规技术与知识也能懂得与人相处的方式。此外,他也强调人类的和平是由善待身边每一个人开始。

拉曼生所呈现的 “一个大马” 民族舞蹈,充分展现马来西亚民族之间的融洽


甘地,金,池田和平建设的传承”由将在拉曼大学文遗堂举办一连三天的展览与和平活动。这次展览展出三名受世人景仰的和平战士,印度国父圣雄甘地,美國民權運動領袖马丁路德金和日本創價學會的名譽會長池田大作的经历和理念。


现场将会有学生帮忙解说甘地,马丁路德金和池田大作的经历和理念。


这项活动由美国莫尔豪斯大学金国际研究所主办,马来西亚创价学会,马来西亚和平联盟和拉曼大学协办,一连维持三天的展览和讲座,希望学生能透过这展览更加了解和平崇高的理想与节操。

此活动至六月十五号下午四点,有兴趣参加者可要尽快到场一睹和平战士的辉煌史了。


什么是创价学会?
马来西亚创价学会(Soka Gakkai Malaysia, 简称SGM)成立于1984年,是一个以13世纪日本僧侣日莲的教导和《法华经》为信仰和修行的根本,是一个积极推动和平、文化和教育活动的佛教团体。

References: http://j-on-news.blogspot.com/2012/06/blog-post_14.html


10 June 2012

Why Jailbreak ?


There are multiple reasons to jailbreak, including :
  • changing the iOS experience with powerful tweaks that can't ever exist on the AppStore : SBSettings, WinterBoard, IntelliScreenX, LockInfo, and lot of others... 
  • playing retro games on console and arcade emulators. 
  • having access to a unix shell in you pocket, and all the open source software that can run on a unix OS. 
The jailbreak is not meant for (and we are totally against it) :
  • pirating AppStore applications 
Also please don't pirate Cydia tweaks, there are people working hard on these, and the price is usually low. There's no reason to do that. 


09 June 2012

How to save SHSH blobs for iOS 5.1.1 to use them in Future?


Currently, this is a perfect time for all the Jailbreak community because fortunately now the Jailbreak for all iOS devices is available. All thanks to the Chronic Dev team and Pod2g to bring Absinthe 2.0 to Jailbreak iOS 5.1.1 on new iDevices. As the untethered jailbreak is out, we will recommend you to back up your SHSH blobs so that you will able to downgrade to previous version to get untethered Jailbreak.


SHSH blobs is a signature file that will help you to downgrade your iOS devices to previous version. Normally, when you Jailbreak your iDevice, it will automatically save your SHSH blobs on Cydia server. So, we will recommend you to check weather Cydia has saved blobs iOS 5.1.1 or not. To check it, open Cydia and you will see iOS 5.1.1 written next to the SHSH just above the “Welcome to Cydia”. If you didn’t have saved SHSH blobs, you can follow any of the method mentioned below to save SHSH blobs for iOS 5.1.1.

1. Using Tiny Umbrella:

This is the oldest and most reliable method, it will also save your SHSH blobs on your PC so you can stitch them using Redsn0w or iFaith. All you have to do is, download the latest version of TinyUmbrella [Links Here] on your PC/Mac and connect your iPhone, iPod Touch or iPad with PC using USB Cable. Click on ‘Save SHSH blobs” and it will save all the available SHSH blobs.


2. Using iSHSHit 1.1.0:

If you are away from your PC and want to save SHSH blobs without connecting your iDevice with PC, this is the best solution for you. Latest version of iSHSHit also helps you to save SHSH blobs for iOS 5.1.1. It is actually a Cydia package, which can be downloaded from Cydia for free. After downloading, open it up and follow the on screen instructions to save SHSH blobs. You can even Email those SHSH blobs to use them in future.


Which method seems to be more feasible for you?


References: http://jailbreakhow.net/how-to-save-shsh-blobs-for-ios-5.1.1-to-use-them-in-future


07 June 2012

Pirated Movie Release Formats 如何区分影片质量


Nobody can say that they have never seen or downloaded pirated movies, actually one of the Internet's main use is to watch pirated movies. In recent times the pirated Version of the  movies are available on the Internet on the same day of the movie release. But before downloading pirated movies you have to check release format. If you don't have the knowledge of the pirated movie formats you would be left with a bad copy of the film when other better prints were available for download. So i thought about writing about the popular pirated movie formats. Mostly the information is taken from wikipedia but i have also included my own opinions and experiences of the formats so if you want you can take a look at the wikipedia article. So here are the different formats arranged mostly in the sequence of their releases time.

Type:- CAM
Label :- CAMRip or CAM
Mostly CAM version of the movies appear online on the same day of the movie release. CAM copies of the movies are made by recording the movie using a camcorder in the theaters. Due to this, the print quality depends upon the quality of the camcorder. The sound quality too is not that good as it is recorded by the camcorder.
Note:- If you are in a real hurry to watch the movie and the only available version is a CAM, then try to download the movie from good site uploaded by popular warez groups like FXG, aXXo, Devise etc. If downloading from torrent please read the comments, you can get a fairly good idea of the print by reading the comments.

Type:- Telesync
Label:- TS or PreDVD
TS versions are CAM versions with a better audio from a secondary source.
PreDVD are rips of pirated DVD sold on the roadside. The actually are CAM versions, maybe of higher quality.
Note:- If you have waited for a TS and PreDVD copy i would suggest to wait a couple of days more for better quality prints.

Type:- Pay-Per-View Rip
Label:- PPVRip
These are rips of the moveis from the Pay per view sources .The are good quality prints and with good sound. Recently this prints have become very common.

Type:- Screener
Label :- DVDScr
These are the rips of the DVD and BR of the movie sent to the reviewers and other peoples for the purpose of reviewing the movie. Mostly the copies have watermarks or message. Some times some of the film sequences are in Black and White.

Type:- Region 5
Label:- R5
R5 are rip of the DVD of the movies available in the region 5 which consist of the Indian subcontinent, Africa, North Korea, Russia and Mongolia.
Note:- It is suggested that the audio quality of the R5 prints is not that good because the audio is synced later from some secondary source. But my experience with R5 rips has been good and i was not able to find many difference between the audio, so i would suggest its OK to download R5 rips.

Type:- HDTV or DS rip
Label:- HDTV, TVrip or DTHrip
This are rips captured from the analog or DTH sources.

Type:- DVD and Blu-Ray rips
Label:- DVDrip and BDrips
These are the best quality rips as the are ripped from the official DVD and Blu-Rays of the movie.
Note:- In recent times the DVD and Blu-Rays appear online very quickly so if you are not in a great hurry to see the movie, i would suggest to wait for this version of the movie.

There are some more version but his are the most popular and common and i would suggest you to stick with this versions.

经常会和朋友们分享最新上架的电影,在分享电影的时候,就会涉及到一些常见的视频专业名词,一般不容易理解,且很难却分什么样的影片质量好,什么样的影片质量差。下面就常见的TS、TC、CAM、SCR、DVDRip、DVDScr、VHSRip、TVRip、DivXRe-Enc、RMVB、SUBBED给予详细解释!

CAM
        通常是用数码摄像机从电影院盗录。有时会使用小三角架,但大多数时候不可能使用,所以摄像机会抖动。同时由于放摄像机的座位并非总是空的,使得有时拍摄不是水平的。如果后期剪裁很好,这很难看出,除非屏幕下方有字幕。由于声音是从摄像机自带的话筒录制,所以经常会录到观众的笑声等声音,尤其是喜剧片。因为这些因素,图象和声音质量通常都很差。但有时很幸运电影院相当空,这样会录到好一些的声音。

TS (TELESYNC)
     除了使用外置的音源(一般是影院座椅上为听力不好的人设的耳机孔),TELESYSNC(TS) 和CAM的标准是相同的。这个直接的音源并不能保证是好的音源,这是它因为受到很多背景噪音的干扰。很多时候TS是在空的影院录制,或是用专业摄像机在投影室录制,所以图象质量可能比CAM好。质量的起伏可能很大,在下载前最好查看SAMPLE。很大比例的TS是从CAM错误标记成。

TC (TELECINE)
     使用电视电影机从胶片直接数字拷贝,其图象和声音质量应该很好。但由于使用的设备和费用很高,TC很少见。通常会使用正确的高宽比,但有时也有4:3的TC。去年的侏罗纪公园III是一个很好的例子。不应将TC和TimeCode(时间码)混淆,时间码是一个在屏幕上可见的计数器。

 SCR(SCREENER)
     SCREENER(SCR)是在电影发行VHS录象带之前送到录象出租店及其他地方用做促销目的。SCREENER使用VHS录象带,通常使用4:3(全屏)的高宽比,但有时也会有LETTERBOXED(1.85:1宽银幕) SCREENER. 主要的缺点是有“TICKER”(在屏幕下方滚动的消息,包含版权和反盗版电话号码)。同时,如果录象带包含任何序列号或可以导致查出录象带来源的记号,这些记号必须被遮掉,通常使用一个黑斑遮住上述部位。有时这些记号只出现几秒钟,有时也可能不幸在怎个电影中出现,而且有时会很大。根据使用的设备,SCREENER的质量可能是极好,如果是从原版拷贝;也可能很差,如果是从翻录的拷贝录制,同时又使用很烂的捕捉设备和录象机。大多数的SCREENER被转制成VCD,现在也出现了SVCD;有些看起来比另一些好。

DVDscr(DVD-SCREENER) 
     DVD-SCREENER(DVDscr)和SCREENER相似,但是从DVD转制。通常是1.85:1宽银幕,但是不包括零售版会有的花絮。TICKER经常不在黑边里,所以会影响观看。如果转制者稍有技术,DVDScr应该很好。通常被转制成SVCD或DivX/XviD。

DVDRip
    DVDRip是从最终版的DVD转制。如果可能,应该是使用预售版(比如,星球大战2)。质量应该很好。通常被发布成SVCD或DivX/XviD

VHSRip
VHSRip是从零售版VHS录象带转制,主要是滑冰/体育内容和XXX发布。

TVRip
    从电视(最好是从数码有线电视/卫星电视捕捉)转制的电视剧,或接收由卫星提前几天向电视网传送的预播节目(不包含加密但有时有雪花)。有些节目,比如WWF RAW IS WAR包含多余的部分;”DARK MATCHES”和CAMERA/COMMENTARY测试被包含在TVRip里。PDTV是从PCI数码电视卡捕捉,通常效果最好;破解组织倾向于使用SVCD来发布。VCD/SVCD/DivX/XviD rips也都被用于发布TVRip。

DivXRe-Enc
    DivXRe-Enc是从原始VCD发布用DivX编码成的小一些的文件。通常可在文件共享网络找到。它们通常以Film.Name.Group(1of2)等形式命名。常见的发布组织有SMR和TND。这些版本通常不值得下载,除非你不清楚某部电影,只想要200MB的版本。一般应避免。

SUBBED
    对于VCD发布而言,SUBBED通常表示字幕被压进了电影。它们通常是马来语/中文/泰文等,有时有两种语言。它们可能占据了很大一部分屏幕。SVCD支持外挂字幕,所以DVDRip用外挂字幕发布。这些信息可以在NFO文件中找到。

RMVB
   在大部分的BT网站上,我们见的更多的是rmvb格式的,一般在文件名上都会出现***-rmvb,例如:DVDRip-RMVB,这个表示电影文件是由DVDRip版本压缩成RMVB的。这种格式占用容量一般小得多,并且内嵌字幕,但是效果要降低的很多。

另,关于电影的其他参数:
PROPER:完整版
UNARATE:未删节
R_RATEE:有删节
WS:表示宽银幕
FS:表示全屏幕
WITH EXTRAS:影片带花絮


References:
http://hacking-for-beginners.blogspot.com/2011/07/pirated-movie-release-formats.html
http://www.dyxiazai.com/movie-quality-distinguish


31 May 2012

Bypass Windows 7 Admin Account With No CD


Hi all users, here is a new exploit for bypassing windows 7 admin security which requires no CDs or other third party tools. I don't know if its been patched or not, but I'm sure that it 100% works.

1. Press the power button to turn on your computer.

2. While your on the screen with the animated Microsoft logo press and hold the power button until it turns off.

3. Press the power button to turn on again.

4. You should now see the option to launch Start Up Repair. Select the option and press enter.

5. Run Startup Repair.

6. You should see a blue bar that moves across the screen repeatedly. Above it should be messages that say "searching for problems" or something.

7. The message should change to "Attempting repairs" within a few minutes.

8. Leave the computer running. This message should be there for 10-40 minutes depending on your computer.

9. After 10-40mins a message should pop up that says "start up repair could not fix the problem". Click the arrow next to "show problem details".

10. Scroll to the bottom and click the link to the .txt file.

11. Notepad should open up with the file.

12. In notepad click File -> Open.

13. You can now use the file browser to perform the sethc.exe hack.

14. Go to C:\Windows\system32 and find sethc.exe and rename it to random.exe or something.

15. Copy the cmd.exe and rename the copied file to sethc.exe

16. Restart the computer and at the login screen press the "shift" key 5 times in quick succession.

17.  Type in the cmd window "control userpasswords2" without the quotation marks.

18. You can now make a new admin account and login with it or make your account an admin.

Enjoy......


References: http://sharepirate.com/freedownloads/bypass-windows-7-admin-account-with-no-cd/


30 May 2012

How to Enable/Load Two or More External Hard Drives on Windows 7 (Identical Signatures - Same Brand, Manufacture, Size)

Cause:
This issue is caused by the two drives having identical signatures, leading to a Signature Collision. This is different from the drive's serial number, which is always unique.

Solution 1: 

Normally the Operating System (OS) (Such as Windows XP and Windows Vista) will automatically correct the issue when the second drive is connected. However, in Windows 7, this does not occur. When using Windows 7, please follow the steps below to give one of the drives a new unique signature.

Critical: Follow these steps carefully. Improper use of Windows Disk Managment tool can result in permanent loss of data.


1. Connect each drive (one at a time) and create a backup of any data you may already have stored on the device.
2. Connect both drives to the computer.
3. Open the Start Menu, type diskmgmt.msc and press Enter.


4. On the lower part of the Disk Management window, look for a disk which is listed as Offline.
5. Verify that you have a Signature Collision by holding your mouse over the drive. You will receive a pop-up explaining why the drive is offline.


6. Right click on the disk in the area that says Offline, and select Online
7. The drive will be given a new signature. A new Drive Letter should appear and you should now be able to access the drive. 

OR 

1. Go to Computer Management --> Disk Management 
2. Check the status of the drive that is plugged in but Windows 7 is not recognizing. 

You may notice that is offline with a notice that reads as follows: 
"The disk is offline because it has a signature collusion with another disk that is online." 

3. Simply right-click the offline disk and click 'online.' 
Problem should be solved! 


Solution 2: 

1. Go to Start Menu 
2. Type Computer Management
3. When this opens, select Storage then Disk Management
4. Find the USB disk you are interested in. 
5. Right Click on the partition, select Change Drive Letter and Path... 
6. Pick an available letter. 
7. Repeat steps 4 to 6 for each disk/partition. 


Solution 3: 

01. Plug in and turn on the external USB hard drive 
02. Right click on My Computer 
03. Left click on Manage 
04. Left click on Device Manager 
05. Expand the USB list 
06. Find the USB device for your USB Hard Drive (in my case it was the one that had no description) 
07. Right click - Uninstall 
08. Turn off the external USB hard drive 
09. Turn on the external USB hard drive and let it find and install the driver 
10. It should work 


References: 


Related Posts Plugin for WordPress, Blogger...